


How to make a consistently flaky lard pie crust from scratch?
The Unrivaled Flakiness of Lard
For generations, experienced bakers have sworn by lard as the secret to the most tender, flaky, and flavorful pie crusts. Unlike butter, which has a lower melting point and contains water, pure lard (especially leaf lard) is 100% fat with a higher melting point. This unique composition creates distinct pockets of steam during baking, separating the layers of dough and resulting in an unparalleled flakiness that butter or shortening alone simply can’t achieve. If you’re looking to elevate your pie game, mastering the lard pie crust is a crucial step.
Creating a consistently flaky lard pie crust from scratch isn’t just about using the right fat; it’s about technique, temperature, and a little patience. Forget tough, brittle crusts. With the right approach, you’ll be producing golden, melt-in-your-mouth pastry every time.

Essential Ingredients for Success
The beauty of a perfect pie crust lies in its simplicity. You only need a few high-quality ingredients:
- All-Purpose Flour: Use unbleached all-purpose flour for best results.
- Lard: Opt for high-quality, unsalted, rendered lard. Leaf lard is often recommended for its neutral flavor and superior flakiness. Ensure it’s very cold, almost firm.
- Salt: A pinch of salt enhances the flavor of the crust.
- Ice Water: This is critical! Very cold water helps keep the lard solid and prevents gluten development, which can lead to a tough crust.
Step-by-Step Guide to Flaky Perfection
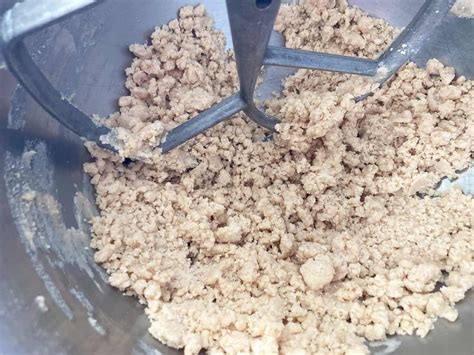
1. Combine Dry Ingredients and Cut in Lard
In a large bowl, whisk together the flour and salt. Add the very cold lard, cut into 1/2-inch cubes. Using a pastry blender, your fingertips, or a food processor, cut the lard into the flour until the mixture resembles coarse meal with some pea-sized pieces of lard remaining. These larger pieces are key to flakiness.
2. Add Ice Water Gradually
Gradually add ice water, one tablespoon at a time, mixing lightly with a fork or your hands. You want just enough water for the dough to come together. The exact amount can vary based on humidity and flour. Stop adding water as soon as the dough holds together when squeezed. Over-wetting will make the dough sticky and tough.
3. Form and Chill the Dough
Gently gather the dough into a ball and then flatten it into a disc. Avoid overworking the dough, as this develops gluten and will make your crust tough. Wrap the disc tightly in plastic wrap and refrigerate for at least 30 minutes, or preferably an hour. Chilling allows the flour to hydrate and the lard to firm up, making the dough easier to roll.

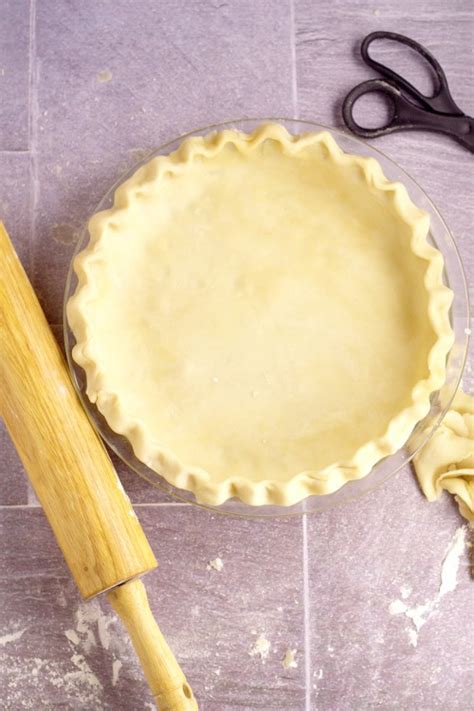
4. Rolling and Shaping
On a lightly floured surface, roll out the chilled dough from the center outwards, rotating it frequently to prevent sticking and to maintain an even thickness. Aim for a circle about 1/8-inch thick and 1-2 inches larger than your pie plate. Carefully transfer the rolled dough to your pie plate, trim the edges, and crimp as desired. If making a double-crust pie, repeat the process for the top crust.
Tips for Consistently Flaky Crusts
- Keep Everything Cold: This is arguably the most important rule. Cold lard prevents it from melting into the flour, which is essential for creating those flaky layers. Use ice water, and even chill your mixing bowl and flour if your kitchen is warm.
- Don’t Overwork the Dough: Minimal handling prevents gluten from developing, ensuring a tender, not tough, crust.
- Don’t Skimp on Lard: While a healthy ratio is important, don’t be afraid of the fat. Lard is what delivers that incredible flakiness and rich flavor.
- Blind Bake When Necessary: For custard pies or quiches, blind baking (pre-baking) the crust can prevent sogginess and ensure a crisp bottom.
Conclusion
Creating a consistently flaky lard pie crust from scratch is a baking skill that will serve you well for any pie, tart, or quiche. With a focus on cold ingredients, gentle handling, and quality lard, you’ll soon be enjoying perfectly golden, crisp, and flavorful crusts that are truly a cut above the rest. Experiment with this technique, and prepare to impress everyone with your pie-making prowess.


