


How to prevent soggy bottom pie crusts for homemade fruit pies?
The Ultimate Guide to a Crispy Pie Bottom
There’s nothing quite as satisfying as a warm, homemade fruit pie, fresh from the oven. Yet, for many home bakers, this culinary dream can quickly turn into a soggy nightmare. The dreaded “soggy bottom” – a crust that’s undercooked, wet, and lacks that delightful flaky texture – is a common affliction for fruit pies. But fear not! With a few expert techniques, you can banish the soggy bottom forever and achieve perfectly crisp, golden crusts every time.
The primary culprit behind a soggy pie bottom is moisture. Fruit fillings release a lot of liquid during baking, and without proper precautions, this moisture seeps into the bottom crust, preventing it from fully cooking and crisping up. Understanding how to manage this moisture is key to pie-baking success.
Blind Baking: Your First Line of Defense
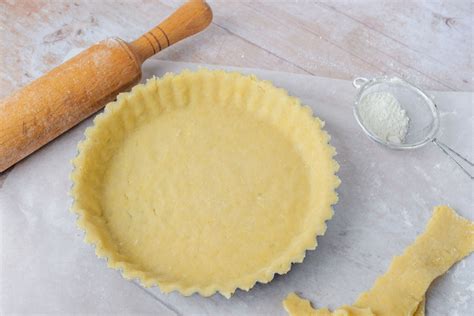
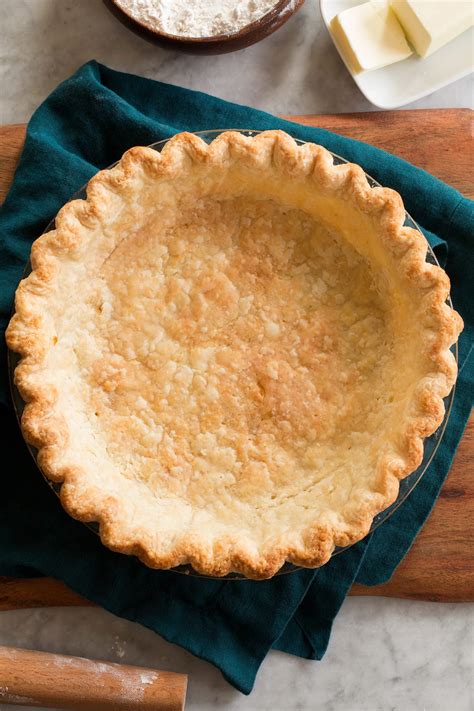
Blind baking, or pre-baking, your pie crust is arguably the most crucial step in preventing a soggy bottom, especially for wetter fruit fillings. This process partially cooks the crust before the filling is added, giving it a head start and creating a firmer barrier against moisture.
To blind bake, prick the bottom and sides of your pie crust all over with a fork. Line the crust with parchment paper and fill it with pie weights, dried beans, or rice. Bake in a hot oven (around 400°F/200°C) for 15-20 minutes, or until the edges are lightly golden. Remove the weights and parchment, then continue baking for another 5-10 minutes until the bottom appears dry and lightly colored. This partial bake creates a sturdy, somewhat waterproof foundation.

Creating a Moisture Barrier: Egg Wash or Butter
Even after blind baking, adding an extra layer of protection can make a significant difference. Before adding your fruit filling to the blind-baked crust, consider applying a thin moisture barrier.
A common method is to brush the bottom and sides of the partially baked crust with a lightly beaten egg white or a whole egg wash. The egg proteins will cook and create a thin, impermeable seal. Alternatively, you can brush the hot crust with a thin layer of melted butter, which also forms a barrier. For a slightly different approach, some bakers lightly sprinkle a tablespoon of fine breadcrumbs or crushed cornflakes on the bottom of the crust before adding the filling; these will absorb any excess moisture.
Taming the Juices: Thickening Your Fruit Filling
While a juicy fruit pie is delicious, excessive liquid is the enemy of a crisp crust. Properly thickening your fruit filling is essential to minimize the amount of free-flowing moisture that can seep into the bottom crust.
Common thickeners include cornstarch, tapioca flour (or Minute Tapioca), and all-purpose flour. Each has its own properties: cornstarch creates a very clear, glossy filling; tapioca results in a slightly cloudy but stable gel; and flour gives a more opaque, gravy-like consistency. Ensure you use the correct amount for your specific fruit and recipe. For very juicy fruits like berries or peaches, you might even cook down a portion of the fruit with the sugar and thickener beforehand to reduce the liquid volume before filling the pie shell.

Temperature Control and Adequate Baking Time
The baking process itself plays a vital role. Ensure your oven is preheated to the correct temperature before you put the pie in. Often, recipes call for starting the pie at a higher temperature (e.g., 425°F/220°C) for the first 15-20 minutes to set the crust quickly, then reducing it to a lower temperature (e.g., 375°F/190°C) for the remainder of the baking time. This initial blast helps crisp up the bottom before the filling has too much time to release its juices.
Don’t be tempted to pull the pie out too early. A fully baked pie will have a filling that is bubbling thickly in the center (indicating the thickener has activated), and the crust, especially the bottom, will be golden brown. If the top crust starts to brown too quickly, loosely tent it with aluminum foil.

The Critical Cooling Period and Other Tips
Once your pie emerges from the oven, resist the urge to slice into it immediately. Cooling is a crucial step that allows the filling to set completely and the crust to firm up. Slicing a hot pie often results in a runny filling and a softer crust, even if it was perfectly baked. Allow the pie to cool on a wire rack for several hours, or even overnight, especially for fruit pies.
Other small tips include ensuring your pie crust isn’t rolled too thin (a slightly thicker bottom crust offers more protection), and always placing your pie on a preheated baking sheet when it goes into the oven. This helps transfer heat directly to the bottom crust, promoting crispness. Also, if your pie has a top crust, remember to cut vents to allow steam to escape, preventing a soggy top crust and ensuring even baking.
Conclusion: Bake with Confidence
Preventing a soggy bottom pie crust is a skill that comes with practice and attention to detail. By incorporating techniques like blind baking, applying moisture barriers, properly thickening your fruit fillings, managing oven temperatures, and allowing adequate cooling time, you can elevate your homemade fruit pies from good to absolutely spectacular. Say goodbye to disappointingly soft crusts and hello to flaky, golden perfection with every slice. Happy baking!


