


How to safely can excess garden tomatoes without a pressure canner?
Embracing the Abundance: Why Tomatoes Are Perfect for Water Bath Canning
As summer ripens, gardens often yield a bountiful harvest of tomatoes, leaving many home growers wondering how to preserve this delicious bounty. While pressure canning is essential for low-acid foods, the good news for tomato lovers is that most tomatoes can be safely preserved using the simpler water bath canning method. This technique relies on the natural acidity of tomatoes, supplemented with a little extra acid, to prevent the growth of harmful bacteria, making it an ideal choice for the country living enthusiast.
Understanding the science behind canning tomatoes without a pressure canner begins with acidity. Tomatoes are borderline low-acid foods, meaning their pH can sometimes hover near the threshold where botulism spores can thrive. To ensure safety, it’s crucial to add a small amount of acid, typically bottled lemon juice or citric acid, to each jar. This lowers the pH sufficiently, making the water bath method a reliable and safe way to capture the taste of summer for months to come.

Essential Equipment for Water Bath Canning
Before you begin, gather the necessary tools. Having everything ready streamlines the process and ensures safety. You’ll need:
- Water Bath Canner: A large pot with a lid and a rack to keep jars off the bottom. Any large stockpot deep enough to cover your jars by at least an inch of water will work.
- Canning Jars: Mason jars with new lids and bands (rings). Always use new lids for proper sealing.
- Jar Lifter: For safely placing and removing hot jars.
- Funnel: A wide-mouth funnel for cleanly filling jars.
- Ladle: For transferring hot tomato product.
- Bubble Remover/Headspace Tool: A non-metallic utensil to remove air bubbles and measure headspace.
- Clean Cloths: For wiping jar rims.
- Large Stockpot: For preparing your tomato product.
- Basic Kitchen Tools: Peeler, knives, cutting board.
- Bottled Lemon Juice or Citric Acid: Critical for ensuring safety.

Step-by-Step Guide: Preparing Your Tomatoes
Proper preparation is key to a successful and delicious canned product. Whether you’re making whole tomatoes, crushed, or diced, the initial steps are similar.
1. Select and Wash Tomatoes
Choose ripe, firm tomatoes free from blemishes. Wash them thoroughly under cool running water. Avoid overripe or spoiled tomatoes, as they can compromise the safety and flavor of your canned product.
2. Prepare for Peeling (Optional but Recommended)
For easier peeling, core your tomatoes and score a small ‘X’ on the bottom. Blanch them in boiling water for 30-60 seconds, then immediately transfer them to an ice bath. The skins should slip off easily. If desired, you can also remove seeds, though many home canners leave them for added texture and flavor.
3. Dice or Crush Tomatoes
Depending on your recipe, dice, chop, or crush your peeled tomatoes. For crushed tomatoes, you can lightly cook them down to release juices and reduce volume before canning.
4. Prepare Jars and Add Acid
Wash canning jars in hot, soapy water and rinse well. Keep them hot until filling to prevent thermal shock. Place new lids in a small saucepan and heat gently (do not boil) according to manufacturer directions. Add bottled lemon juice or citric acid directly to each empty hot jar:
- For pint jars: 1 tablespoon bottled lemon juice OR 1/4 teaspoon citric acid.
- For quart jars: 2 tablespoons bottled lemon juice OR 1/2 teaspoon citric acid.
Do NOT use fresh lemon juice, as its acidity can vary.
Filling Jars and Processing in the Water Bath
With your tomatoes and jars ready, it’s time to bring everything together.
1. Fill Jars
Carefully ladle your hot tomato product into the hot jars, leaving 1/2 inch of headspace (the space between the food and the rim of the jar). Use a funnel for a clean fill. For whole tomatoes, pack them tightly, pressing gently to remove air pockets and fill spaces with juice.
2. Remove Air Bubbles and Wipe Rims
Using a non-metallic spatula or bubble remover, run it along the inside of the jar to release trapped air bubbles. Adjust headspace if necessary. Wipe jar rims thoroughly with a clean, damp cloth to ensure a perfect seal. Any food residue on the rim can prevent sealing.
3. Apply Lids and Bands
Center a new, warm lid on each jar. Screw on the band finger-tight (just until resistance is met, no overtightening). This allows air to escape during processing.
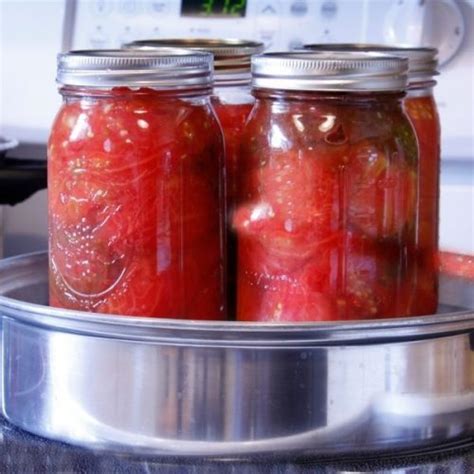
4. Process in the Water Bath Canner
Place jars on the rack in your water bath canner. Ensure jars are not touching each other. Fill the canner with hot water until it covers the jars by at least 1-2 inches. Cover the canner with its lid. Bring the water to a rolling boil. Once boiling, begin your processing time. Processing times vary by altitude and tomato product type; consult a reputable canning guide (e.g., USDA Complete Guide to Home Canning) for precise times. As a general guideline, pint jars of crushed tomatoes typically process for 35-40 minutes, and quarts for 45-50 minutes, at sea level.
Cooling, Sealing, and Storage
The final steps are crucial for ensuring a safe and long-lasting preserve.
1. Cool Jars
Once the processing time is complete, turn off the heat and remove the canner lid. Let the jars sit in the hot water for 5 minutes before carefully removing them with a jar lifter. Place the hot jars upright on a towel-lined surface or a cooling rack in a draft-free area, leaving space between them for air circulation. Do not disturb them for 12-24 hours.
2. Check Seals
After 12-24 hours, check for proper seals. Lids should be concave (curved inwards) and not flex when pressed. If a lid does not seal, refrigerate the contents immediately and consume within a week, or reprocess within 24 hours with a new lid and band, following the full processing time.
3. Store Properly
Remove bands from sealed jars (this prevents rust and allows for easier detection of a spoiled seal later). Wipe jars clean and label them with the contents and date. Store in a cool, dark, dry place. Canned tomatoes are best consumed within one year for optimal quality.

Safety Tips and Best Practices
- Always use tested recipes from reliable sources like the USDA or university extension offices.
- Never alter the amount of acid specified in a recipe for tomatoes.
- Ensure proper headspace; too little can lead to siphoning, too much can prevent a seal.
- Do not overtighten bands before processing; air needs to escape.
- If a jar does not seal, do not attempt to re-process after 24 hours.
- Never consume food from a jar with a bulging lid, cloudy liquid, or unusual odor, as these are signs of spoilage.
Preserve Your Harvest with Confidence
Canning your excess garden tomatoes using the water bath method is a rewarding skill that connects you directly to your food source. By following these guidelines, you can safely and confidently preserve the vibrant flavors of your garden’s bounty, providing delicious, home-canned tomatoes to enjoy all year long, without the need for a pressure canner.

