


Safest beginner canning method for excess garden tomatoes?

Embracing the Abundance: Preserving Your Tomato Harvest
There’s nothing quite like the taste of a sun-ripened tomato straight from your garden. However, when the harvest truly begins to roll in, many gardeners find themselves with an abundance that’s impossible to consume fresh. This is where canning becomes an invaluable skill, allowing you to enjoy that summer flavor all year long. For beginners, the thought of canning can seem daunting, but with the right method and strict adherence to safety guidelines, it’s a rewarding and straightforward process. When it comes to tomatoes, one method stands out as the safest and most accessible for those new to home preservation.
Understanding Canning: Pressure vs. Water Bath
Before diving into the specifics for tomatoes, it’s crucial to understand the two primary canning methods: pressure canning and water bath canning. The choice depends entirely on the acidity level of the food being preserved.
- Pressure Canning: Used for low-acid foods (pH greater than 4.6), such as most vegetables, meats, and poultry. This method reaches temperatures above boiling point, essential for destroying harmful bacteria like Clostridium botulinum.
- Water Bath Canning: Used for high-acid foods (pH 4.6 or lower), which include most fruits, pickles, jams, jellies, and properly acidified tomatoes. The high acidity, combined with boiling temperatures, is sufficient to preserve these foods safely.
Tomatoes are unique because their acidity can vary significantly based on variety, ripeness, and growing conditions. While some heirloom varieties might lean towards lower acidity, most common canning tomatoes are high enough in acid to be safe for water bath canning when additional acid is added.
Why Water Bath Canning is Best for Beginner Tomato Preservation
For beginners, water bath canning is the recommended method for tomatoes due to its simplicity and the lower initial investment in equipment compared to pressure canning. It’s also less intimidating. The key to safely water bath canning tomatoes lies in ensuring adequate acidity. Always add a small amount of acid, typically bottled lemon juice or citric acid, to each jar. This critical step guarantees that the pH level is low enough to prevent the growth of harmful bacteria, even if your specific tomato batch is naturally less acidic.
Essential Equipment for Water Bath Canning Tomatoes
Before you begin, gather your tools:
- Large Water Bath Canner with Rack: A pot large enough to fully immerse your canning jars in boiling water, with a rack to keep jars off the bottom.
- Canning Jars: Mason jars (pint or quart size are common for tomatoes) with new lids and screw bands.
- Jar Lifter: For safely placing and removing hot jars from the canner.
- Canning Funnel: To minimize mess when filling jars.
- Headspace Tool/Ruler: To accurately measure the space between the food and the lid.
- Bubble Remover Tool/Non-Metallic Spatula: To release air bubbles from filled jars.
- Large Stockpot: For cooking tomatoes.
- Towels: For drying jars and protecting surfaces.
- Bottled Lemon Juice or Citric Acid: Essential for acidification.
Step-by-Step Guide: Water Bath Canning Crushed Tomatoes
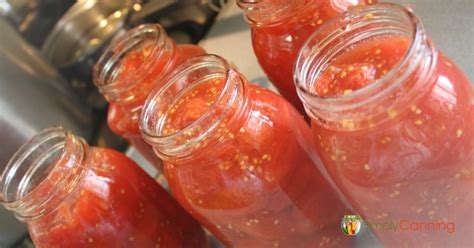
This method focuses on crushed tomatoes, a versatile base for sauces, soups, and chilis.
1. Prepare Jars and Lids
Wash jars, lids, and bands in hot, soapy water. Jars should be kept hot until filled. Lids only need to be washed; pre-heating them in simmering water is no longer recommended by major canning authorities like the National Center for Home Food Preservation (NCHFP).
2. Prepare Your Tomatoes
Wash ripe tomatoes thoroughly. To easily peel, blanch them in boiling water for 30-60 seconds, then immediately transfer to an ice bath. The skins should slip off easily. Core the tomatoes and remove any blemishes.
3. Cook the Tomatoes
Roughly chop or crush your peeled tomatoes. Place them in a large stockpot and bring to a boil, stirring frequently to prevent scorching. Reduce heat and simmer for 5-10 minutes, or until desired consistency is reached. This also helps eliminate air.
4. Add Acid to Jars
This is a crucial safety step. For each pint jar, add 1 tablespoon of bottled lemon juice or 1/4 teaspoon of citric acid. For each quart jar, add 2 tablespoons of bottled lemon juice or 1/2 teaspoon of citric acid. Do this directly into the clean, hot jars before filling with tomatoes.
5. Fill Jars
Using a canning funnel, ladle the hot crushed tomatoes into the prepared hot jars, leaving 1/2 inch of headspace. Run a non-metallic spatula or bubble remover tool around the inside of the jar to release trapped air bubbles. Adjust headspace if necessary.
6. Wipe Rims and Apply Lids
Wipe the jar rims clean with a damp cloth to ensure a good seal. Place a new, clean lid on each jar, centering it. Screw on the band fingertip-tight (just until resistance is met, no need to overtighten).
7. Process in Water Bath Canner
Place filled jars onto the rack in your water bath canner. Ensure there is at least 1 inch of water covering the tops of the jars. Bring the water to a rolling boil. Once boiling, start your timer for the recommended processing time (check a reliable source like the NCHFP, as times vary by altitude and jar size).
- Pint Jars: Typically 35 minutes (adjusted for altitude)
- Quart Jars: Typically 45 minutes (adjusted for altitude)
8. Cool and Check Seals
Once processing is complete, turn off the heat and carefully remove the canner lid. Let the jars sit in the hot water for 5 minutes before carefully removing them with a jar lifter. Place jars on a towel-lined surface in a draft-free area, leaving space between them to cool for 12-24 hours. Do not disturb them.
After cooling, check the seals. Lids should be concave (curved inward) and not flex when pressed. Remove the screw bands and try to lift the lid with your fingertips; if it holds firm, it’s sealed. Any unsealed jars must be reprocessed within 24 hours (with new lids) or refrigerated and consumed within a few days.
Safety First: Always Follow Tested Recipes
Always rely on up-to-date, scientifically tested canning recipes from reputable sources like the National Center for Home Food Preservation (NCHFP), university extension offices, or the USDA Complete Guide to Home Canning. Do not guess or rely on old family recipes that may not include proper acidification or processing times, as these can pose health risks. Remember, canning is a science, and precision ensures safety.
Enjoy Your Preserved Bounty!
With water bath canning, you can transform your garden’s summer bounty into delicious, shelf-stable crushed tomatoes, ready to be used in countless meals throughout the year. It’s a skill that provides immense satisfaction and allows you to savor the taste of your hard work long after the growing season has ended. Happy canning!

