


Safest DIY method for canning low-acid vegetables?
Understanding the Risks of Low-Acid Canning
Canning is a time-honored tradition for preserving fresh produce, extending the harvest, and enjoying garden-fresh flavors year-round. However, when it comes to low-acid vegetables, safety is paramount. Unlike high-acid foods (such as most fruits, pickled vegetables, or tomatoes with added acid), low-acid vegetables create an environment where a dangerous bacterium, Clostridium botulinum, can thrive. This bacterium produces a toxin that causes botulism, a severe and often fatal form of food poisoning. Because of this critical risk, specific preservation methods must be strictly followed to ensure your canned goods are safe to consume.
Why Pressure Canning is the ONLY Safe Method
For low-acid foods – which include most common vegetables like green beans, corn, peas, carrots, potatoes, asparagus, and meats – a water bath canner simply isn’t sufficient. A water bath canner reaches boiling point (212°F or 100°C), which is not hot enough to destroy the spores of Clostridium botulinum. To effectively neutralize these spores, a temperature of at least 240°F (116°C) is required. This temperature can only be achieved by using a pressure canner, which heats food under pressure, raising the boiling point of water inside the sealed unit. Therefore, pressure canning is the only scientifically recognized safe method for preserving low-acid vegetables.
Essential Equipment for Safe Pressure Canning
Before you begin, gather all necessary equipment. Investing in quality tools is crucial for both safety and success.
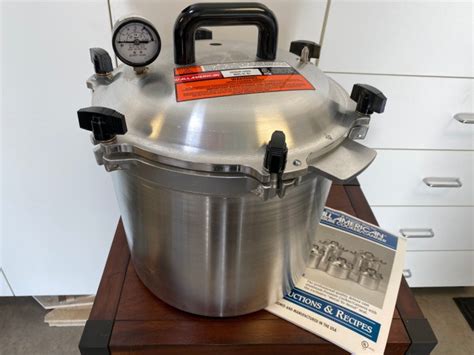
- Pressure Canner: Choose a canner that accommodates the size and quantity of jars you plan to process. It must have an accurate pressure gauge (dial gauge or weighted gauge).
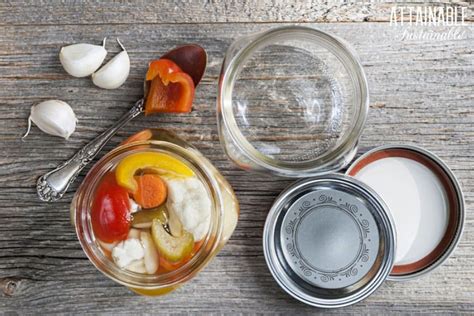
- Canning Jars: Use only standard canning jars (e.g., Mason jars) specifically designed for canning. Inspect them for cracks or chips.
- Two-Piece Lids: New lids (flats) must be used every time; screw bands can be reused if not rusty or dented.
- Jar Lifter: For safely placing and removing hot jars.
- Canning Funnel: To prevent spills and keep jar rims clean.
- Bubble Remover/Headspace Tool: A non-metallic tool to remove air bubbles and measure headspace.
- Clean Cloths: For wiping jar rims.
Step-by-Step Guide to Safely Pressure Canning Low-Acid Vegetables
1. Prepare Your Vegetables and Jars
Select only fresh, blemish-free vegetables. Wash them thoroughly. Prepare vegetables according to your recipe (e.g., snap beans, cut corn). Wash canning jars, lids, and bands in hot, soapy water and rinse well. Jars must be hot when filled to prevent breakage. Keep empty jars hot in a pan of hot water or a dishwasher until ready to fill. Lids can be simmered (not boiled) as per manufacturer’s instructions.
2. Pack the Jars
You can use either a raw pack or hot pack method, depending on the vegetable and recipe. Raw pack involves filling jars with raw vegetables, then adding boiling liquid. Hot pack involves pre-cooking vegetables briefly, then filling jars with hot vegetables and hot liquid. Always leave the recommended headspace (usually 1 inch for low-acid foods) at the top of the jar to allow for expansion and proper sealing. Use a canning funnel to keep jar rims clean.

3. Remove Air Bubbles and Wipe Rims
After filling, slide a non-metallic spatula or bubble remover around the inside of the jar to release trapped air bubbles. Adjust headspace if necessary. Wipe jar rims thoroughly with a clean, damp cloth to ensure a clean sealing surface. Place lids centered on jars and screw bands finger-tight (do not overtighten).
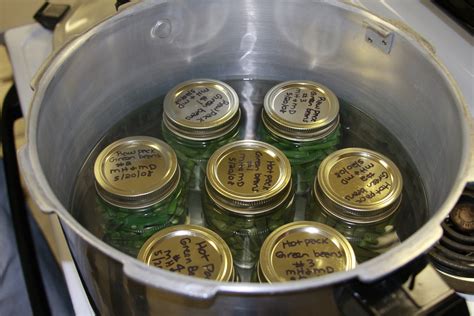
4. Load the Pressure Canner
Place the rack in the bottom of your pressure canner. Add 2-3 inches of hot water, or as specified by your canner’s manufacturer. Carefully place the hot, filled jars onto the rack, ensuring they are not touching each other. Secure the canner lid, making sure it’s properly locked.
5. Vent the Canner
Turn the heat to high. Allow steam to escape steadily from the vent pipe (or petcock) for 10 minutes. This “venting” step is critical for removing all air from the canner. If air remains, the temperature inside the canner will not reach the necessary level for safe processing, even if the gauge reads the correct pressure.
6. Process at the Correct Pressure and Time
After venting, place the weighted gauge (or close the petcock and allow the dial gauge to rise) and let the pressure rise to the level specified in your tested recipe (typically 10 or 11 pounds of pressure for most altitudes, or higher for weighted gauges). Begin timing only when the correct pressure is reached and stable. Maintain a steady pressure throughout the processing time, adjusting heat as needed. Do not let the pressure fluctuate, as this can compromise food safety.
7. Cool Down and Remove Jars
Once processing is complete, turn off the heat. Allow the canner to cool naturally until the pressure returns to zero. Do NOT rush this process by forcing cooling (e.g., running cold water over the canner), as this can cause siphoning (liquid loss from jars) and spoil seals. Once the pressure gauge reads zero, wait another 5-10 minutes for the canner to equalize, then carefully remove the lid. Using a jar lifter, remove the hot jars and place them on a towel or cooling rack, ensuring they are not touching. Allow them to cool undisturbed for 12-24 hours.
Post-Canning Checks and Storage
After 12-24 hours, check all jar seals. A properly sealed lid will be concave (curved inward) and will not flex when pressed. If any jar did not seal, refrigerate and consume its contents within a few days, or reprocess within 24 hours using a new lid. Remove screw bands, wipe jars clean, label them with contents and date, and store in a cool, dark, dry place. For maximum quality, consume within one year.
Crucial Safety Reminders
Always follow tested, up-to-date recipes from reliable sources like the National Center for Home Food Preservation (NCHFP) or university extension offices. Never alter processing times or pressures. Adjust pressure for altitude if you live above 1,000 feet. If in doubt, throw it out! Botulism toxin is odorless and tasteless, so never taste food from an unsealed or questionable jar. Canning is rewarding, but safety must always be the top priority.
