


Simple DIY plans for a predator-proof chicken coop on a small homestead?

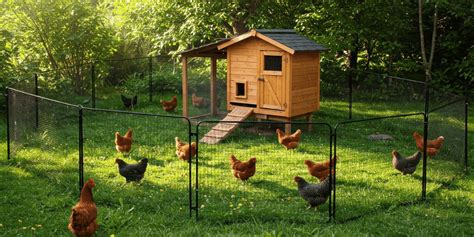
Owning chickens on a small homestead brings immense joy and fresh eggs, but it also comes with the responsibility of protecting your flock from predators. A well-built, predator-proof chicken coop is the cornerstone of a healthy and safe flock. While store-bought coops can be expensive, building your own allows for customization and ensures robust security tailored to your specific needs. Here, we’ll outline simple DIY plans to construct a fortress for your feathered friends without breaking the bank.
Why Predator Proofing is Crucial
Many common predators, from raccoons and foxes to hawks and neighborhood dogs, view chickens as an easy meal. Even seemingly harmless creatures like rats and snakes can steal eggs or injure chicks. A poorly constructed coop offers little defense, leading to heartbreaking losses. Effective predator proofing means understanding the common tactics predators use and designing barriers to thwart them.
Key Principles of a Secure Coop
- Strong Walls and Roof: Use sturdy lumber and weather-resistant sheeting.
- Hardware Cloth, Not Chicken Wire: This is paramount. Chicken wire only keeps chickens in; 1/2-inch galvanized hardware cloth keeps predators out.
- Secure Foundation: Predators can dig. An apron of hardware cloth buried around the perimeter or a solid concrete slab deters burrowing.
- Robust Latches: Raccoons are dexterous. Use barrel bolts or carabiner clips that require more than a simple flip.
- No Gaps or Holes: Regularly inspect for any openings larger than 1/2 inch.
- Overhead Protection: A solid roof protects from aerial predators and weather.
Essential Materials & Tools for Your DIY Coop
Before you start building, gather your materials. Opt for quality where it counts, especially for security features. For a small coop suitable for 4-6 chickens, you won’t need an overwhelming amount of supplies.
Typical Materials List:
- Lumber: 2x4s for the frame, 2x2s for smaller supports, exterior-grade plywood or OSB for walls.
- Hardware Cloth: 1/2-inch galvanized, plenty for all windows, vents, and the run.
- Roofing Material: Metal sheeting, asphalt shingles, or even heavy-duty tarps.
- Door Hardware: Heavy-duty hinges, barrel bolts or slide latches.
- Fasteners: Exterior screws (deck screws are excellent), nails.
- Foundation Material: Concrete blocks, gravel, or poured concrete.
- Optional: Paint/sealant, nesting boxes, roosting bars, automatic door opener.

Basic Tools:
- Circular saw or miter saw
- Drill/driver
- Staple gun (heavy-duty for hardware cloth)
- Tin snips (for hardware cloth)
- Measuring tape, level, pencil
Step-by-Step Construction Guide for a Simple Coop
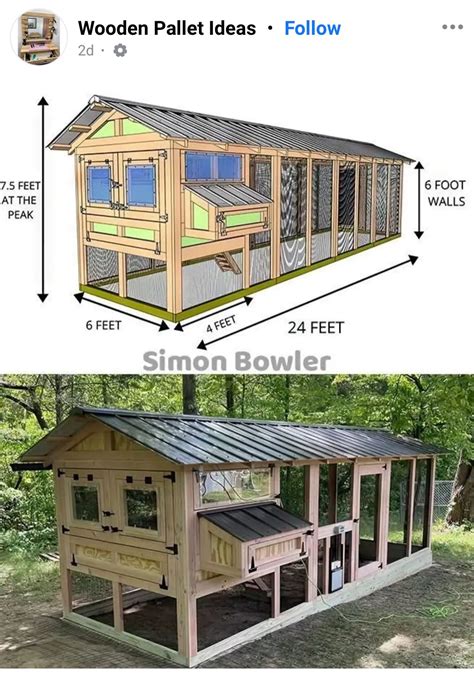
While designs can vary, the core principles remain. Here’s a simplified guide for a basic, elevated coop with an attached run, often ideal for small homesteads.
Phase 1: The Foundation and Floor Frame
- Site Selection: Choose a level, well-drained spot.
- Base Construction: Create a sturdy 2×4 frame for the coop’s floor. This frame can rest on concrete blocks or pressure-treated skids if you want it movable.
- Secure Floor: Cover the frame with exterior-grade plywood. This is the floor of the enclosed coop.
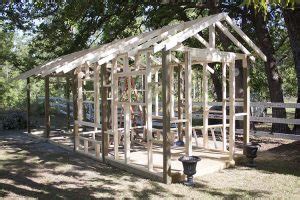
Phase 2: Walls and Roof
- Wall Framing: Build four wall frames using 2x2s or 2x4s, including openings for a door, windows, and vents.
- Attach Walls: Securely fasten the wall frames to the floor frame.
- Roof Frame: Build a simple gable or shed-style roof frame, ensuring a slight slope for water runoff.
- Sheath Walls and Roof: Cover the wall frames with plywood/OSB and the roof frame with plywood. Install your chosen roofing material. Ensure all seams are tight and predator-proof.
Phase 3: Doors, Windows, and Vents (Security First!)
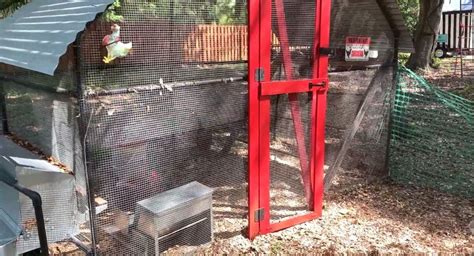
- Main Door: Construct a sturdy door for human access. Install heavy-duty hinges and at least two predator-proof latches (e.g., barrel bolts on both top and bottom).
- Chicken Entrance/Exit: Create a small pop-door for the chickens. This also needs a secure locking mechanism. An automatic door opener can be a worthwhile investment for convenience and security.
- Windows/Vents: Cover all openings with 1/2-inch hardware cloth, securely stapled every 2-3 inches and then reinforced with wooden trim. Never use chicken wire for these openings.
Phase 4: The Predator Apron and Run (Optional but Recommended)
If you plan an attached outdoor run, the predator apron is critical:
- Dig a Trench: Around the perimeter of your coop and desired run area, dig a trench about 6-12 inches deep and 12-18 inches wide.
- Install Hardware Cloth Apron: Lay hardware cloth flat in the trench, extending it out about 12-18 inches from the coop/run wall, then bend it up the wall. This creates an L-shaped barrier that deters digging. Backfill the trench.
- Build Run Frame: Frame the walls and top of your run using lumber.
- Cover Run: Encase the entire run (sides and top) with 1/2-inch hardware cloth, again stapling securely and reinforcing with trim. Predators can climb and jump, so a fully enclosed run is safest.
Beyond Construction: Features & Maintenance
Once the structure is built, outfit your coop with interior essentials and commit to regular maintenance.
Interior Essentials:
- Roosting Bars: Chickens love to roost off the ground. Use sturdy branches or 2x2s with rounded edges.
- Nesting Boxes: Provide one box for every 3-4 hens. Dark, quiet, and easily accessible for egg collection.
- Ventilation: Essential for air quality. Ensure high vents (covered with hardware cloth) and possibly lower ones for good airflow, preventing ammonia buildup and respiratory issues.
- Easy Cleaning Access: Design a large door or removable panel for easy cleaning.
Ongoing Maintenance:
Even the best-built coop needs regular checks. Inspect hardware cloth for tears, latches for wear, and the coop structure for any gaps or weaknesses a persistent predator might exploit. Reinforce as needed. Keep the area around the coop clear of brush where predators might hide.
Building a predator-proof chicken coop is a rewarding DIY project that ensures the safety and well-being of your flock. By focusing on sturdy construction, the right materials (especially hardware cloth), and meticulous attention to detail, you can create a secure haven for your chickens, giving you peace of mind and many years of fresh eggs on your small homestead.
