


Simple DIY raised garden bed design for beginners using reclaimed wood?

Unleash Your Inner Gardener: Building a Simple Raised Bed with Reclaimed Wood
Embarking on your gardening journey can be both exciting and rewarding, and there’s no better way to start than with a raised garden bed. For beginners, the idea of building one might seem daunting, but it doesn’t have to be. By utilizing reclaimed wood, you can create a beautiful, functional, and eco-friendly garden space without breaking the bank or requiring advanced carpentry skills. This guide will walk you through designing and constructing a simple raised bed, perfect for your first foray into homegrown goodness.
Why Choose Reclaimed Wood for Your Raised Bed?
Using reclaimed wood isn’t just a trend; it’s a smart choice for several reasons. Firstly, it’s incredibly cost-effective, often available for free or at a very low price from construction sites, old fences, pallets, or even online marketplaces. Secondly, it’s an environmentally conscious decision, diverting wood from landfills and giving it a second life. Lastly, reclaimed wood often boasts a unique character and weathered aesthetic that can add rustic charm to your garden, making your raised bed truly one-of-a-kind. Just ensure the wood is untreated or treated with non-toxic preservatives, especially if you plan to grow edibles.
The Benefits of a Raised Garden Bed for Beginners
Raised garden beds offer a multitude of advantages that make gardening easier and more successful, particularly for novices:
- Improved Soil Quality: You get to choose and control your soil mix, ensuring optimal drainage and nutrient levels from the start.
- Better Drainage: Raised beds naturally drain better than in-ground gardens, preventing waterlogging and root rot.
- Reduced Weeding: With contained, curated soil, weed seeds are less likely to establish themselves.
- Easier Access: No more bending over as much! The elevated height makes planting, tending, and harvesting more comfortable.
- Pest Control: A raised barrier can deter some ground-dwelling pests.
- Earlier Planting: The soil in raised beds warms up faster in spring, allowing you to plant earlier.
Planning Your Simple Raised Bed Design
Before you start cutting, a little planning goes a long way. Consider these points:
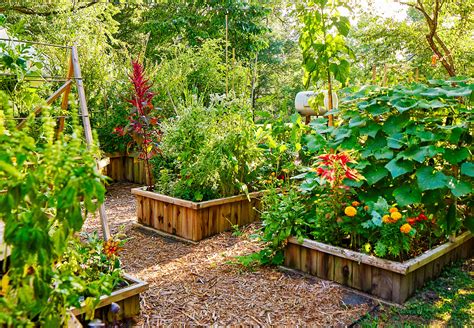
- Size and Shape: For beginners, a rectangular bed around 4×8 feet or 4×4 feet is manageable. Keep the width to a maximum of 4 feet so you can reach the center easily from either side. Height-wise, 10-12 inches (one to two boards high) is sufficient, though deeper beds (18-24 inches) allow for deeper root vegetables and even better drainage.
- Location: Choose a spot that receives at least 6-8 hours of direct sunlight daily for most vegetables. Ensure it’s level or can be easily leveled.
- Wood Type: Common reclaimed wood sources include cedar fence boards (naturally rot-resistant), redwood, Douglas fir, or even pine (though pine will break down faster unless treated, so avoid pressure-treated wood for edibles). Pallet wood can also be used, but ensure it’s marked HT (heat-treated) and not MB (methyl bromide) treated.

Gathering Your Materials and Tools
Materials:
- Reclaimed Wood: Enough boards to create your desired dimensions. For a 4×8 ft bed, 12 inches high, you’d need two 8ft boards and two 4ft boards per layer. For 12 inches high, you’d need two layers (total four 8ft boards and four 4ft boards) or fewer if using wider planks.
- Corner Posts (optional but recommended): 2×2 or 4×4 pieces of wood for internal corner support (e.g., 4 pieces, 12 inches long).
- Screws: Exterior-grade wood screws (3-inch long are good for connecting 1-inch thick boards to corner posts).
- Landscape Fabric or Cardboard (optional): To line the bottom and prevent weeds from growing up.
- Staple Gun and Staples (if using liner).
- Plenty of Soil: A good mix of topsoil, compost, and perhaps some vermiculite or perlite.
Tools:
- Measuring Tape
- Pencil
- Saw (hand saw, circular saw, or miter saw)
- Drill/Driver with appropriate bit for screws
- Level
- Shovel or Trowel
- Safety Glasses and Gloves

Step-by-Step Construction Guide for Beginners
1. Prepare Your Wood
Clean any dirt or debris from your reclaimed wood. If necessary, cut your boards to the desired lengths for the sides and ends of your bed. For a 4×8 foot bed, you’ll need two 8-foot boards and two 4-foot boards per layer. Lightly sand any rough edges if desired.
2. Assemble the First Layer
Lay out two long boards and two short boards to form a rectangle. If using corner posts, stand them upright at each corner. Align the ends of your side boards flush with the corner posts (or butt joints if not using posts). Predrill pilot holes to prevent splitting, then secure the boards to the posts with exterior-grade screws. For simpler butt joints without posts, simply screw the end of one board into the face of the perpendicular board, ensuring squareness.
3. Add Subsequent Layers (if building higher)
If your bed is going to be taller than one board high, stack the next layer of boards on top of the first, aligning them carefully. Secure them to the corner posts, and also consider screwing them into the board directly below for added stability. Ensure your structure is level as you go.
4. Position and Level Your Bed
Once the frame is assembled, move it to its final location. Use a level to ensure the bed is sitting evenly on the ground. If the ground isn’t perfectly flat, you can dig out small amounts of soil or add small shims under the low spots until it’s level. This is crucial for proper drainage and aesthetics.
5. Add a Liner (Optional but Recommended)
While not strictly necessary, lining the bottom of your raised bed with landscape fabric or a layer of cardboard can help suppress weeds and prevent soil from washing out through gaps in the wood. Simply lay it down and staple it to the inside bottom edges of the frame.
6. Fill with Soil and Plant!
This is the fun part! Fill your raised bed with a high-quality soil mix. A good combination often includes equal parts topsoil, compost, and a draining amendment like perlite or vermiculite. Once filled, you’re ready to plant your chosen vegetables, herbs, or flowers. Follow planting instructions for spacing and depth.
Tips for a Thriving Raised Bed Garden
- Watering: Raised beds can dry out faster than in-ground gardens, especially in hot climates. Monitor soil moisture regularly.
- Soil Amendments: Replenish nutrients annually by adding fresh compost.
- Mulch: Apply a layer of organic mulch (straw, wood chips) around your plants to conserve moisture, regulate soil temperature, and suppress weeds.
- Crop Rotation: Even in a small bed, rotating your crops can help prevent soil-borne diseases and nutrient depletion.
Conclusion
Building a simple raised garden bed from reclaimed wood is a rewarding project that’s well within the reach of any beginner. Not only will you create a beautiful and productive space for your plants, but you’ll also contribute to sustainable living. So gather your materials, follow these steps, and get ready to enjoy the bounty of your very own DIY raised garden bed!


