


Simple DIY root cellar design for storing homegrown produce?

Introduction: Rediscover Ancient Food Preservation
For centuries, root cellars have been an ingenious solution for preserving nature’s bounty without the need for modern refrigeration. As interest in homegrown produce and sustainable living grows, rediscovering the art of the root cellar offers a practical and energy-efficient way to store your harvest through the colder months. Building a simple DIY root cellar is more accessible than you might think, transforming your backyard into an extended pantry for your fruits and vegetables.

The Core Principles of a Successful Root Cellar
The magic of a root cellar lies in its ability to mimic ideal storage conditions found underground: consistent cool temperatures, high humidity, darkness, and good ventilation. Understanding these principles is key to designing an effective cellar, regardless of its complexity.
- Cool Temperatures: Generally between 35-50°F (2-10°C) slows down ripening and spoilage.
- High Humidity: Around 85-95% humidity prevents produce from drying out and shriveling.
- Darkness: Keeps produce from sprouting and retains nutrients.
- Ventilation: Fresh air circulation prevents the buildup of ethylene gas (which can accelerate ripening) and helps regulate temperature and humidity, deterring mold.
Simple DIY Root Cellar Designs for the Home Gardener
You don’t need to dig a basement-sized chamber to enjoy the benefits of a root cellar. Several easy-to-implement designs are perfect for the home gardener:
- Buried Barrel/Trash Can Cellar: Ideal for smaller harvests, this involves burying a food-grade plastic barrel or galvanized steel trash can, complete with drainage and ventilation.
- Earth Mound Cellar: Similar to a barrel cellar but uses a larger pit lined with straw or pallets, covered by a mound of earth, providing excellent insulation.
- In-Ground Pit Cellar: A slightly larger excavated pit, often lined with wood or concrete blocks, offering more storage capacity than a barrel but still relatively simple to construct.
- Modified Unheated Space: For those with a cool, damp basement corner, an unheated crawl space, or even an insulated, shaded outdoor shed, these can sometimes be adapted into a functional root cellar with minor modifications for humidity and ventilation.
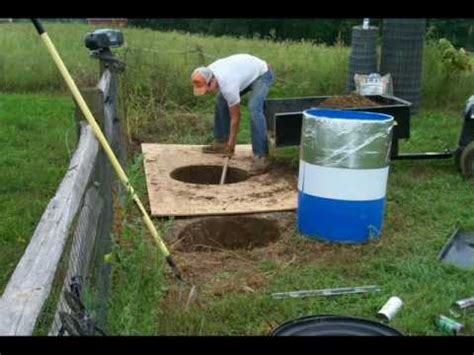
Step-by-Step: Building a Basic Buried Barrel Root Cellar
Let’s focus on one of the simplest and most popular DIY methods: the buried barrel root cellar. This design is excellent for storing root vegetables, apples, and pears.
1. Choosing Your Location
Select a shaded, well-drained spot in your yard. Avoid areas prone to standing water or direct sunlight. A north-facing slope can offer natural advantages for consistent coolness.
2. Excavation
Dig a hole large enough to accommodate your food-grade plastic barrel or metal trash can, leaving about 6-12 inches of space around the sides for insulation. Ensure the depth allows the top of the barrel to be just below or at ground level once installed.
3. Preparing the Container
If using a plastic barrel, drill several small drainage holes in the bottom. For both barrel and trash can, consider lining the bottom with a few inches of gravel or sand to further aid drainage and deter rodents. Clean the container thoroughly.
4. Ensuring Proper Ventilation
This is crucial. You’ll need two ventilation pipes: an intake and an exhaust. PVC pipes (2-4 inches in diameter) work well. Cut holes near the bottom of the barrel for the intake pipe (extending into the barrel) and near the top for the exhaust pipe. Both pipes should extend above ground level, with their tops covered by a screen or cap to prevent pests and rain. Position the intake pipe closer to the bottom of the barrel and the exhaust pipe closer to the top to encourage air circulation.

5. Insulation and Cover
Place your prepared barrel into the excavated hole. Pack the space around the barrel with insulating materials like straw, wood chips, or gravel. This helps maintain stable temperatures. Cover the top of the barrel with a sturdy, insulated lid (e.g., a thick piece of plywood covered with insulation and earth). You can then mound earth over the lid and surrounding area to further insulate it, creating a slight dome for water runoff.
What to Store and How to Maintain Your Cellar
Root cellars are perfect for potatoes, carrots, beets, parsnips, turnips, apples, pears, cabbage, and even some varieties of winter squash. Ensure produce is cured properly before storing (e.g., potatoes and squash need a period of warmth and moderate humidity to heal skins), and remove any bruised or damaged items, as one bad apple can spoil the bunch.
Regularly check your cellar for temperature, humidity, and signs of spoilage. Remove any decaying produce immediately to prevent contamination. Clean your cellar thoroughly once a year, typically in spring, before the next harvest season.

Conclusion: Enjoying Your Homegrown Bounty Year-Round
Building a simple DIY root cellar is a rewarding project that reconnects you with time-honored preservation techniques. It’s an investment in food security, sustainability, and the delicious taste of your homegrown harvest, available long after the growing season ends. With a little planning and effort, you can enjoy fresh produce from your garden throughout the year, truly making the most of your hard work.
