


Simple DIY root cellar plans to store garden bounty year-round?
Embracing Year-Round Freshness with a DIY Root Cellar
Imagine harvesting your garden’s bounty and knowing you can enjoy it months later, without refrigeration or complex canning. This dream becomes a reality with a simple DIY root cellar. Root cellars are an ancient, effective method of food preservation, leveraging natural coolness and humidity to extend the life of many fruits, vegetables, and even some herbs. They are a cornerstone of sustainable living, reducing waste and reliance on energy-intensive storage methods.
Building a root cellar might sound like a daunting task, but many effective designs are surprisingly simple and can be adapted to various budgets and skill levels. The core principles remain the same: a cool, dark, humid, and well-ventilated space that mimics underground conditions to keep produce dormant and fresh.
The Fundamentals of a Successful Root Cellar
Before diving into specific plans, understanding the ideal conditions for a root cellar is crucial. Aim for a temperature range between 35-50°F (2-10°C) and high humidity, typically 85-95%. Good air circulation is also vital to prevent mold and spoilage. These conditions slow down respiration and ripening, preserving the texture, flavor, and nutritional value of your harvest.
Consider your local climate, soil type, and the amount of produce you anticipate storing. Simple doesn’t mean less effective; often, the most basic designs harness natural elements most efficiently.
Simple DIY Root Cellar Options for Every Homeowner
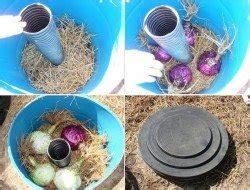
1. The Buried Trash Can or Barrel Cellar
One of the easiest and most cost-effective methods involves burying a large, food-grade plastic trash can or barrel. Dig a hole in a shady, well-drained spot, deep enough so the lid is just above ground level. Drill drainage holes in the bottom and several ventilation holes near the top rim. Place a layer of gravel for drainage, then sand or straw. Store produce in layers, separated by damp straw, sand, or newspaper. Cover with a tight-fitting lid, optionally insulated with more straw or soil.
2. The Straw Bale Root Cellar
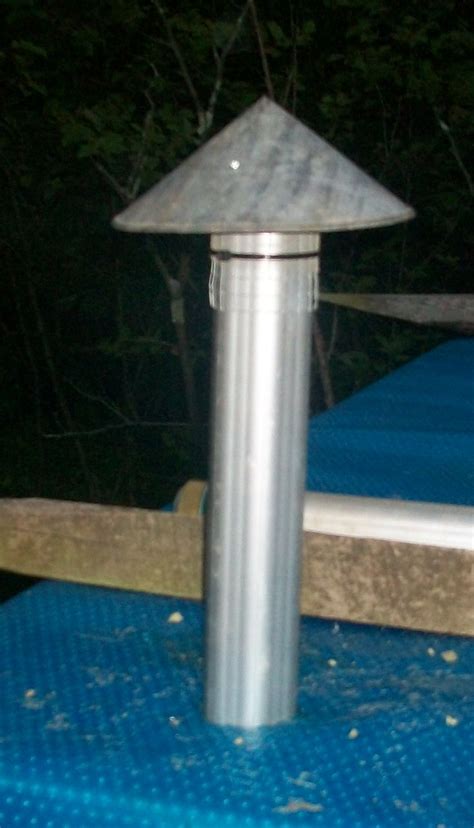
For a temporary or semi-permanent solution, construct a small structure using straw bales. Stack bales to create walls, forming a small enclosure. A simple roof can be made from plywood covered with a tarp and then soil or more straw for insulation. The straw provides excellent insulation, maintaining stable temperatures. Ensure a sturdy door and adequate ventilation shafts (PVC pipes work well) for air exchange.
3. Utilizing an Existing Space: Crawl Space or Unheated Shed
If you have an unheated crawl space, basement corner, or a sturdy shed, you might already have the makings of a root cellar. The key is to insulate it properly, ensure darkness, and control humidity and ventilation. In a crawl space, create an enclosed area with insulated walls and a door. In a shed, add insulation to walls, floor, and ceiling, then incorporate vents. Monitor temperature and humidity closely, adjusting as needed.
4. Earth-Bermed or Mounded Cellar
A slightly more involved but highly effective design is an earth-bermed cellar. This involves building a small wooden or concrete structure and then piling earth against its exterior walls and roof. The earth acts as natural insulation, stabilizing temperatures. This design offers excellent temperature stability and can be scaled up for larger storage needs. Ventilation is critical, often achieved with intake and exhaust pipes.

Key Considerations for Optimal Performance
- Location: Choose a north-facing slope or a heavily shaded area to minimize temperature fluctuations. Avoid areas prone to flooding.
- Ventilation: Essential for preventing stale air and spoilage. Use passive vents (intake low, exhaust high) or small, solar-powered fans for larger cellars.
- Humidity Control: A dirt floor naturally helps maintain humidity. If your cellar has a concrete floor, place tubs of damp sand or gravel, or sprinkle water on the floor occasionally.
- Insulation: Earth, straw bales, foam board, or sawdust can all provide excellent insulation, preventing external temperatures from affecting your produce.
- Pest Control: Secure your cellar against rodents and insects. Use wire mesh over vents and ensure tight-fitting doors.
What to Store in Your DIY Root Cellar
A properly functioning root cellar can store a wide array of produce:
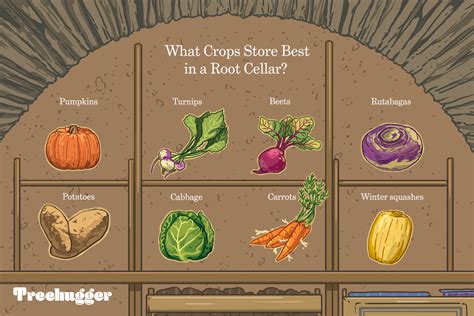
- Root Vegetables: Carrots, potatoes, beets, parsnips, turnips, rutabagas (store in damp sand or sawdust).
- Cabbage Family: Cabbage, kohlrabi.
- Winter Squash & Pumpkins: Store on shelves in slightly drier conditions.
- Apples & Pears: Store separately from other produce due to ethylene gas.
- Onions & Garlic: Prefer cooler, drier conditions than most root crops; store on shelves or hung in mesh bags.
Conclusion: A Sustainable Investment in Your Harvest
Building a simple DIY root cellar is a rewarding project that empowers you to extend the life of your garden’s bounty, reducing food waste and increasing self-sufficiency. With careful planning and attention to the basic principles of temperature, humidity, and ventilation, you can create an effective storage solution that serves your household year-round. Start small, experiment with different methods, and enjoy the taste of your garden’s freshness long after the growing season ends.


