


Simple DIY root cellar shelf plans for storing homegrown produce?

Why Build DIY Root Cellar Shelves?
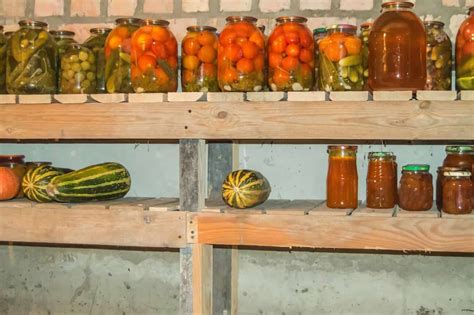
A root cellar is an invaluable asset for anyone looking to extend the shelf life of their homegrown produce. While the cool, stable environment is crucial, proper organization is key to preventing spoilage and ensuring easy access. Simple, sturdy shelves can transform a chaotic storage space into an efficient pantry, keeping your potatoes, carrots, apples, and preserves neatly organized and optimally preserved.
Building your own shelves isn’t just cost-effective; it allows you to customize the design to fit the unique dimensions of your root cellar and the specific types of produce you plan to store. This guide will walk you through basic plans, material considerations, and assembly tips for durable, functional root cellar shelving.

Essential Considerations Before You Build
Before you grab your tools, take some time to plan. The success of your root cellar shelves hinges on a few critical factors:
- Materials: Wood is the most common choice. Opt for untreated lumber like cedar, redwood, or pressure-treated wood (if sealed and cured for a long time outside the root cellar to off-gas chemicals, or choose naturally rot-resistant species) for components that will be in contact with moisture or the ground. For general shelving, untreated pine or spruce can work, but consider a natural oil finish for added moisture resistance without introducing chemicals.
- Ventilation: Good airflow is vital in a root cellar to prevent mold and mildew. Design your shelves with slatted tops rather than solid ones to allow air to circulate freely around your produce.
- Spacing: Consider the size of your produce. You’ll want shelves deep enough to hold bins or baskets, and tall enough to accommodate stacked items or larger vegetables like pumpkins. Leave enough vertical space between shelves for easy access.
- Sturdiness: Root cellar shelves will hold significant weight. Ensure your design uses adequate bracing and strong fasteners to prevent collapse.
Simple Shelf Design: The Ladder Frame Method
One of the easiest and most effective designs involves creating ladder-like frames for the sides, then attaching horizontal slats or solid shelves. This method is highly adaptable and requires basic carpentry skills.
Materials You’ll Need:
- 2x4s or 2x6s for uprights and support beams (untreated pine/spruce or naturally rot-resistant wood)
- 1x4s or 1x6s for shelf slats
- Deck screws (3-inch and 1.5-inch, corrosion-resistant)
- Optional: Wood glue, heavy-duty casters (for mobile units)
Tools:
- Measuring tape
- Pencil
- Saw (circular saw or miter saw recommended)
- Drill/driver
- Level
- Safety glasses and gloves

Step-by-Step Assembly Instructions
1. Measure and Plan Your Space
Determine the height, width, and depth of your desired shelving unit. Sketch out your design, noting the number of shelves and the spacing between them. A typical shelf depth for bins is 18-24 inches, with 12-18 inches of vertical clearance between shelves.
2. Cut Your Lumber
Based on your plan, cut the following pieces:
- Uprights: Four pieces for the vertical supports (height of your unit).
- Side Supports: Two pieces per shelf level for each side frame (depth of your unit minus the thickness of the uprights if notched, or full depth if butt-joined).
- Front/Back Horizontal Supports: Two pieces per shelf level for the front and back of the unit (width of your unit).
- Shelf Slats: Numerous pieces cut to the width of your unit, or slightly shorter to fit between front/back supports.
3. Assemble the Side Ladder Frames
Lay two uprights parallel on a flat surface. Mark the positions for your side support beams. Attach the side support beams between the uprights using two 3-inch deck screws at each joint. Ensure the frame is square using a level or speed square. Repeat for the second side frame.
4. Connect the Side Frames
Stand your two side ladder frames upright. Position the front and back horizontal support beams at each shelf level. Attach these beams to the uprights of the side frames using two 3-inch deck screws at each joint. Start with the bottom and top shelves to stabilize the unit. Double-check that the entire structure is square and level as you assemble.

5. Add the Shelf Slats
Evenly space your 1×4 or 1×6 shelf slats across the horizontal supports. Leave a gap of 0.5 to 1 inch between slats for optimal air circulation. Secure each slat with two 1.5-inch deck screws into the front and back horizontal supports. Repeat for all shelf levels.
Tips for Longevity and Optimal Storage
- Placement: Position shelves away from direct contact with exterior walls if they are prone to sweating, or ensure adequate air gap.
- No Finish: Avoid paints, varnishes, or strong chemical sealants on your shelves, as these can off-gas and affect your produce. If using pressure-treated wood, allow it to air out for several months outdoors before bringing it into the root cellar.
- Pest Control: Keep an eye out for rodents or insects. Proper sealing of your root cellar and occasional inspection of produce can prevent infestations.
- Labeling: Label bins or areas for different types of produce to stay organized.
- Cleanliness: Regularly clean your shelves, especially after emptying them at the end of the season, to prevent mold spores or bacteria from lingering.
With these simple plans and considerations, you can construct robust and effective shelving for your root cellar, turning your homegrown bounty into a long-lasting supply of fresh, nutritious food.


