


Simple DIY steps for building a sturdy compost bin?

Why Build Your Own Compost Bin?
Composting is a fantastic way to turn kitchen scraps and yard waste into nutrient-rich soil for your garden. Not only does it reduce landfill waste, but it also provides a free, organic fertilizer. Building your own compost bin can be a rewarding DIY project, saving you money while giving you a sturdy, custom solution perfectly suited for your space.
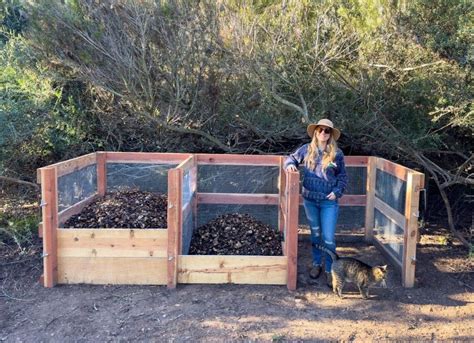
A well-built compost bin needs to be robust enough to withstand the elements, hold a significant amount of material, and allow for proper aeration and drainage. This guide will walk you through building a simple yet sturdy wooden compost bin, ideal for most backyard gardens.
Planning and Gathering Materials
Before you start, decide on the best location for your compost bin. Choose a spot that’s relatively shady to prevent it from drying out too quickly, easily accessible, and close to a water source. For a sturdy wooden bin, you’ll typically need:
- Lumber: Pressure-treated 2x4s or 4x4s for corner posts (at least 4 feet long), and untreated 1x6s or 1x8s for the sides. Reclaimed pallet wood can also be a great, eco-friendly option.
- Hardware: Deck screws (2.5-3 inches), hinges (if adding a lid or access door), and galvanized wire mesh (optional, for aeration or pest control).
- Tools: Measuring tape, saw (hand saw or circular saw), drill, level, square, and safety glasses.
For a basic single-bay bin, aim for dimensions around 3x3x3 feet – a good size for efficient composting without becoming too difficult to turn.

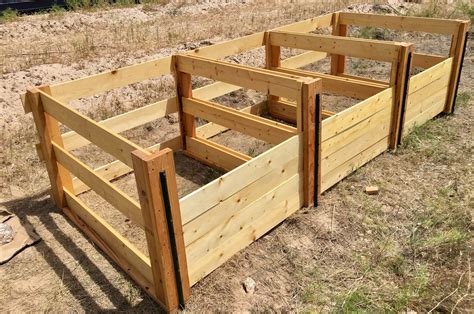
Step 1: Constructing the Frame
The frame provides the structural integrity of your compost bin. Start by cutting your 2x4s or 4x4s into four equal lengths for the corner posts. These will define the height of your bin. For a 3-foot high bin, cut four pieces of 2×4 to 36 inches.
Next, cut horizontal support pieces. You’ll need eight pieces of 2×4 for the top and bottom supports on each side (two per side, front and back). These should be slightly shorter than the desired width/depth of your bin, allowing for the thickness of the corner posts. For a 3-foot wide bin, cut them to approximately 33 inches (36 inches minus two 1.5-inch post thicknesses).
Assemble two sides first: Lay two corner posts parallel on the ground. Attach two horizontal supports (one at the top, one at the bottom) between them using deck screws. Ensure they are square and level. Repeat for the other two corner posts to create the second side frame.
Step 2: Connecting the Sides and Adding Walls
Stand your two assembled side frames upright. Connect them using the remaining horizontal support pieces for the front and back. Screw these supports into the corner posts, creating a sturdy rectangular box frame. Use a level to ensure everything is plumb and square before fully tightening.
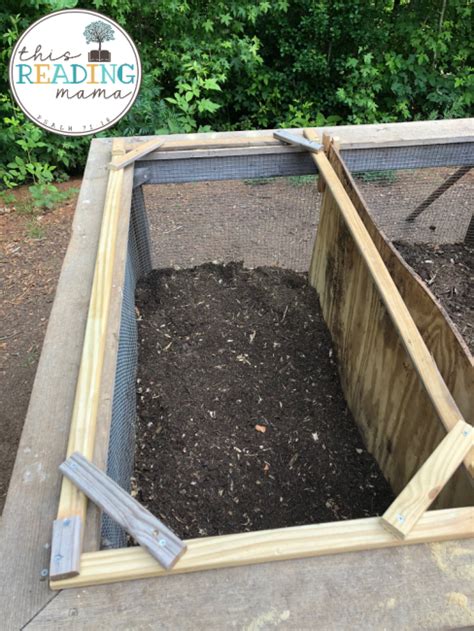
Now, it’s time to add the side walls. Cut your 1x6s or 1x8s to fit the length of each side. For the back and two side walls, you’ll typically nail or screw these boards horizontally to the inside of the 2×4 frame, leaving small gaps (about 1/2 to 1 inch) between boards for air circulation. Start from the bottom and work your way up. These gaps are crucial for aerating your compost pile.
Step 3: Creating an Accessible Front Panel
For the front of your compost bin, you have a few options for accessibility. A simple approach is to stack the boards vertically or horizontally, holding them in place with removable pins or battens. This allows you to easily remove boards from the bottom to access finished compost.
Alternatively, you can build a hinged door or a series of removable slats. For removable slats, attach two vertical 1×2 or 1×4 battens to the inside of the front corner posts. Cut your front wall boards to fit snugly between these battens, allowing them to slide in and out vertically. This design is highly practical for harvesting compost from the bottom.
Step 4: Finishing Touches and Placement
Once the main structure is complete, consider these finishing touches:
- Lid (Optional): A simple hinged lid made from plywood or more lumber can help retain moisture, deter pests, and keep the bin looking tidy. Ensure it has a slight slope for water runoff.
- Hardware Cloth/Mesh: If pests are a concern, line the bottom and/or sides of your bin with galvanized hardware cloth before adding compost material. This allows airflow but prevents rodents from entering.
- Reinforcement: For extra stability, you can add diagonal bracing to the outside corners, particularly if your bin is very large.
Place your finished bin on bare soil to allow beneficial organisms to access the pile and for proper drainage. Begin adding your green (nitrogen-rich) and brown (carbon-rich) materials, remembering to turn your pile regularly for faster decomposition. With these simple DIY steps, you’ll have a sturdy, functional compost bin ready to transform your waste into garden gold!
Maintaining Your Compost Bin
To ensure your new compost bin functions effectively, remember a few key maintenance tips. Aim for a good balance of ‘greens’ (like food scraps and grass clippings) and ‘browns’ (like dry leaves, wood chips, and cardboard). Keep the pile moist, like a wrung-out sponge, and turn it regularly – ideally once a week – to introduce oxygen, which speeds up decomposition and prevents unpleasant odors. A sturdy bin makes this turning process much easier and more efficient.


