


Simplest DIY method to build a sturdy canning jar shelf?
Why a Sturdy Canning Jar Shelf is Essential
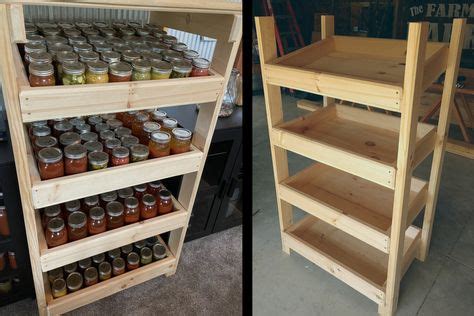
Canning jars, when filled, can be incredibly heavy. A single quart jar of preserved goods can weigh over three pounds, and a shelf full of them can quickly add up to hundreds of pounds. This immense weight demands a shelf that is not only robust but also securely built and installed. Flimsy shelves can sag, crack, or even collapse, leading to a catastrophic loss of your hard work and potentially creating a hazardous mess. This guide will walk you through building a shelf designed specifically for this challenge, using a method that prioritates strength and simplicity.
The Simple Solution: Cleat-Supported Shelves
The simplest yet most effective method for building a heavy-duty shelf involves using horizontal wooden cleats securely fastened to wall studs, with shelf boards resting on top. This technique distributes the weight directly into the structural elements of your wall, providing unparalleled support. Unlike freestanding units that can be tippy or require complex joinery, this method is straightforward, cost-effective, and highly customizable to any space.
Materials You’ll Need
For this project, you won’t need an extensive array of specialized tools or expensive lumber. Focus on strength and durability.
- Lumber:
- (2) 1x2s or 1x3s for vertical supports (length depends on shelf height)
- 1x2s or 1x3s for horizontal cleats (total length = number of shelves x shelf depth x 2)
- 1/2″ to 3/4″ plywood or solid lumber (e.g., 1x12s, 1x10s) for shelf boards
- Hardware:
- 2.5-3 inch wood screws (for attaching to studs)
- 1.5-2 inch wood screws (for attaching cleats to vertical supports and shelf boards to cleats)
- Tools:
- Tape measure
- Pencil
- Level (a long one is very helpful)
- Stud finder
- Drill/driver with appropriate bits
- Hand saw or circular saw
- Safety glasses
Step-by-Step Construction Guide
Step 1: Plan and Measure Your Space
Before cutting anything, accurately measure the space where your shelf will go. Determine the desired width, depth, and height. Consider the height of your canning jars (pint, quart, half-gallon) and ensure enough clearance between shelves. A good rule of thumb is 12-14 inches between shelves for most common jars. Mark the desired locations for your shelves on the wall with a pencil.
Step 2: Cut Your Lumber
Cut all your lumber to size. You’ll need:
- Two vertical supports (length of desired shelf height)
- Horizontal cleats for each shelf (two per shelf, cut to the depth of your shelf)
- Shelf boards (cut to the desired width and depth)
Always double-check your measurements before making cuts.

Step 3: Mark and Install Vertical Supports
Use a stud finder to locate the wall studs where your shelf will be installed. Mark the center of these studs with a pencil. Position your vertical supports on the wall, aligning them with the stud marks. Ensure they are plumb (perfectly vertical) using your level, then pre-drill and secure them to the studs using the 2.5-3 inch wood screws. These vertical supports will provide a solid anchor for your horizontal cleats, especially if your shelf spans multiple studs.
Step 4: Attach the Horizontal Cleats
This is the most critical step for ensuring a level and sturdy shelf. On your vertical supports, mark the height for the bottom of each shelf. Using your level, draw a perfectly horizontal line connecting these marks on both vertical supports. Secure the horizontal cleats (cut to the depth of your shelf) to the vertical supports along these lines using 1.5-2 inch screws. For extra strength, you can also drive screws through the cleats directly into wall studs if they align. Ensure all cleats are perfectly level and securely fastened.
Step 5: Place Your Shelf Boards
With all your cleats securely in place and level, simply lay your cut shelf boards on top of the cleats. For added stability and to prevent the shelves from shifting, you can fasten the shelf boards to the cleats using short wood screws (1.5-2 inch) driven up from underneath or down from the top if you don’t mind visible screw heads.

Step 6: Reinforce and Finish (Optional but Recommended)
To further enhance stability, especially for very long shelves, consider adding a thin piece of plywood or hardboard as a backer panel, screwing it into the vertical supports and studs. This helps prevent items from falling off the back and adds rigidity. Finally, you can sand the shelves smooth and apply a coat of paint, stain, or clear sealant to protect the wood from moisture and make it easier to clean. Allow adequate drying time before loading with jars.

Why This Method Is Ideal for Canning Jars
This cleat-supported shelving system offers several advantages specifically for canning jars:
- Unmatched Strength: By anchoring directly into wall studs, the load is supported by your home’s structure, preventing sagging or collapse.
- Cost-Effective: Uses standard, readily available lumber that is less expensive than pre-fabricated shelving units.
- Customizable: Easily adjust the width, depth, and height of your shelves to perfectly fit your space and jar collection.
- Space-Saving: Eliminates bulky side supports often found in freestanding units, maximizing usable storage area.
- Simple Construction: Requires basic carpentry skills and common tools, making it accessible for most DIY enthusiasts.
Conclusion
Building a sturdy canning jar shelf doesn’t have to be a complicated or expensive endeavor. By following this simple cleat-supported method, you can create durable, reliable storage that will safely hold your cherished preserves for years to come. Take your time, measure twice, and enjoy the satisfaction of a well-organized and secure pantry!


