


Tips for a perfectly crispy, flaky homemade apple pie crust using real butter?
There’s nothing quite like a homemade apple pie with a crust that shatters and melts in your mouth, and real butter is the secret weapon for achieving that ultimate flavor and texture. Forget bland, tough, or soggy crusts – with a few key techniques, you can master the art of the perfect crispy, flaky butter crust. Here’s how to elevate your apple pie from good to legendary.
The Golden Rule: Keep Everything Cold
The number one commandment for a flaky crust is cold ingredients. Real butter, when kept very cold, creates pockets of steam as it bakes, which in turn leads to those desirable flaky layers. If your butter is too warm, it will melt into the flour, resulting in a tough, dense crust instead of a light and airy one.
- Cold Butter: Cut your butter into 1/2-inch cubes and place it in the freezer for 10-15 minutes before you begin.
- Ice Water: Use water that’s truly ice cold. Some bakers even add a few ice cubes to their water and measure from that.
- Chilled Tools: If your kitchen is warm, consider chilling your mixing bowl and even your pastry blender (if using) beforehand.
The Art of Incorporating Butter (Without Overworking)
How you mix the butter into the flour is critical. You want small, distinct pieces of butter distributed throughout the flour, not fully incorporated into a smooth mixture.
- Pastry Blender or Fingers: For the flakiest results, use a pastry blender or your fingertips to cut the cold butter into the flour until it resembles coarse meal with some pea-sized pieces of butter remaining.
- Food Processor (with caution): If using a food processor, pulse just a few times until the desired consistency is reached. Over-processing will melt the butter and develop too much gluten.
- Minimal Handling: The warmth from your hands can melt the butter. Work quickly and efficiently.
Just Enough Water, Gently Mixed
Adding the right amount of ice water is crucial for bringing the dough together without making it sticky or tough.
- Add Gradually: Drizzle the ice water a tablespoon at a time, mixing lightly with a fork or your fingers until the dough just starts to come together.
- Feel for Consistency: The dough should be shaggy but hold together when pressed. Avoid adding too much water, as this will activate too much gluten, leading to a tough crust.
- Don’t Knead: Once the dough just barely comes together, stop mixing. Over-mixing develops gluten, which makes for a chewy, not flaky, crust.

The Crucial Chill: Rest and Relaxation
Chilling the dough is not an optional step; it’s absolutely essential for a tender, flaky crust that’s easy to roll.
- Initial Chill: Form the dough into two flat discs, wrap them tightly in plastic, and refrigerate for at least 30 minutes, or preferably an hour or more. This allows the gluten to relax and the butter to firm up again.
- Post-Roll Chill: After rolling out the dough and fitting it into your pie plate, chill it again for another 15-30 minutes before filling. This helps prevent shrinkage and ensures the butter stays cold for optimal flakiness.
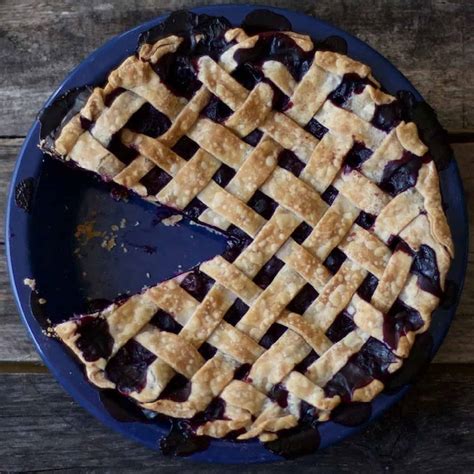
Rolling with Precision, Not Power
When it comes to rolling out your chilled dough, technique matters.
- Lightly Flour Surface: Use just enough flour on your surface and rolling pin to prevent sticking, but don’t overdo it.
- Even Pressure: Roll from the center outwards, rotating the dough frequently to ensure an even thickness and prevent sticking. Avoid pressing down too hard.
- Avoid Stretching: When transferring the rolled dough to your pie plate, gently fold it in half or quarters and unfold it into the plate. Do not stretch it, as this will cause it to shrink back significantly during baking.
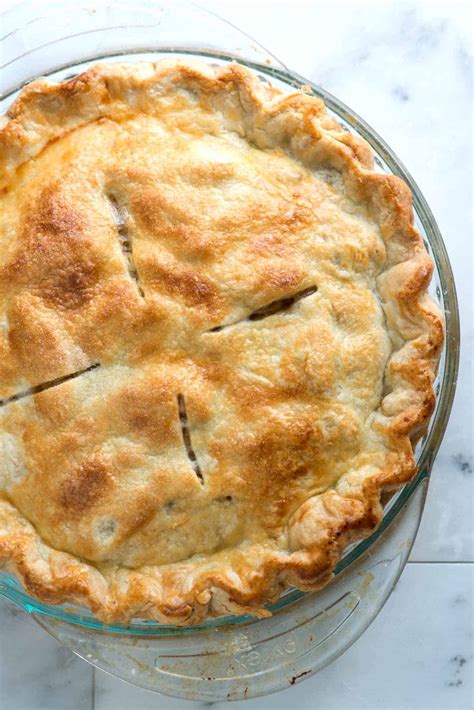
Baking to Perfection: Blind Baking and Temperature
Achieving a crispy bottom crust, especially with a juicy apple filling, often requires a two-pronged approach.
- Blind Bake (for bottom crust): For the crispiest bottom, especially with a very wet filling, consider blind baking your bottom crust. Prick the bottom with a fork, line with parchment paper, fill with pie weights, and bake for 15-20 minutes until lightly golden. Remove weights and parchment, then bake for a few more minutes.
- Hot Oven Start: Many bakers start their pies at a higher temperature (e.g., 425°F/220°C) for the first 15-20 minutes, then reduce it to a moderate temperature (e.g., 375°F/190°C) for the remainder of the baking time. The initial high heat helps set the crust quickly and encourages flakiness.
- Watch for Browning: Keep an eye on the edges. If they’re browning too quickly, cover them loosely with aluminum foil.
Choosing Your Ingredients Wisely
While technique is paramount, starting with quality ingredients sets the foundation.
- High-Quality Unsalted Butter: Use a good quality, unsalted butter for the best flavor and control over saltiness.
- All-Purpose Flour: Standard all-purpose flour works perfectly for pie crust.
- A Pinch of Salt: Don’t forget a pinch of salt in your dough; it enhances the flavor of the butter and balances the sweetness of the filling.
With these tips, you’re well on your way to crafting an apple pie that’s not only delicious on the inside but boasts a perfectly crispy, flaky, golden crust, thanks to the magic of real butter. Enjoy the process, and savor every bite!