


Tips for properly seasoning cast iron skillets for heirloom cooking?

Unlock the Heirloom Potential of Your Cast Iron Skillet
Cast iron skillets are more than just cookware; they are cherished family heirlooms, passed down through generations, carrying stories and flavors within their seasoned surfaces. The secret to their longevity, their natural non-stick properties, and their ability to impart unique flavor to dishes lies in one critical process: proper seasoning. A well-seasoned cast iron skillet is a joy to cook with, ensuring an easy release of food and a beautiful, even sear. Here’s how to properly season your cast iron for a lifetime of culinary legacy.
Understanding Cast Iron Seasoning
At its core, seasoning is the process of baking thin layers of oil onto the cast iron surface. When oil is heated past its smoke point, it polymerizes, transforming into a hard, plastic-like coating that bonds with the metal. This layer is what creates the non-stick surface, protects the iron from rust, and darkens the skillet over time. It’s a cumulative process, with each cooking session and re-seasoning contributing to a stronger, more robust coating.

Preparing Your Skillet for Seasoning
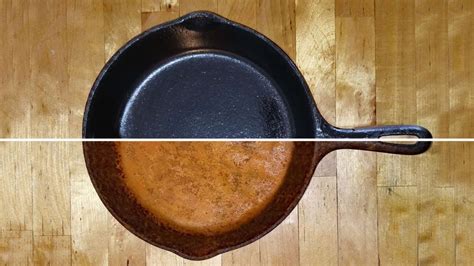
Before you begin the seasoning process, your skillet needs to be impeccably clean. For a brand-new skillet, a quick wash with warm, soapy water to remove any factory wax, followed by a thorough rinse and immediate drying, is sufficient. For an older, rusty, or sticky skillet, you might need to strip off old seasoning. This can be done by scrubbing vigorously with steel wool, using a lye bath, or even a self-cleaning oven cycle (use with caution and research first).
No matter the starting point, the most crucial step after cleaning is to dry the skillet completely. Any moisture left on the surface can lead to rust. You can place it on a stovetop over low heat for a few minutes until it’s bone dry.
The Initial Seasoning Process
Choosing the Right Oil
The best oils for seasoning are those with a high smoke point and good polymerization properties. Popular choices include:
- Grapeseed Oil: High smoke point, relatively neutral flavor.
- Flaxseed Oil: Excellent polymerization, but can be expensive and prone to flaking for some users.
- Vegetable Shortening/Crisco: A traditional choice, affordable, and effective.
- Avocado Oil: Very high smoke point, good for seasoning.
- Canola or Vegetable Oil: Readily available and works well.
Avoid olive oil or butter for seasoning, as their low smoke points will result in a sticky, gummy residue rather than a hard coating.
Applying the Oil and Baking
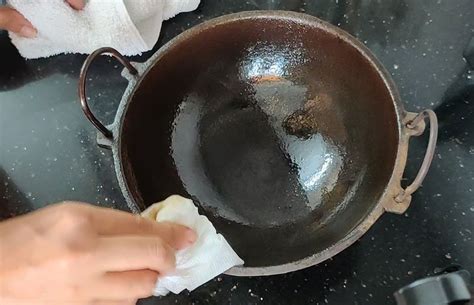
- Apply a VERY thin layer: Dip a paper towel in your chosen oil and rub a minuscule amount over the entire surface of the skillet – inside, outside, and handle.
- Wipe off excess: This is perhaps the most critical step. Using a clean, dry paper towel, wipe off as much oil as you possibly can. The skillet should look dry, not greasy. Any excess oil will turn sticky and gummy rather than polymerizing into a smooth, hard layer.
- Bake: Preheat your oven to a temperature between 450°F and 500°F (232°C-260°C). Place the skillet upside down on the middle rack. This prevents oil from pooling. Place aluminum foil on the rack below to catch any potential drips.
- Bake for one hour: After an hour, turn off the oven and let the skillet cool completely inside the oven. This slow cooling helps the seasoning bond.
Building Up the Seasoning: Multiple Layers Are Key
One layer of seasoning is a start, but a truly great heirloom skillet has multiple layers built up over time. For initial seasoning, repeat the oiling and baking process at least 3-5 times. The more layers you build, the more durable and non-stick your skillet will become. You’ll notice the skillet getting progressively darker and smoother with each cycle.
Maintaining Your Heirloom Skillet After Each Use
Consistent care is vital for maintaining and improving your seasoning.
- Clean Immediately: After cooking, while the skillet is still warm (but not searing hot), scrape out food residue. For stuck-on bits, use hot water and a stiff brush, plastic scraper, or even coarse salt as an abrasive. Avoid harsh dish soaps often, especially when the seasoning is new, as they can strip the oils. Mild soap is generally fine on well-established seasoning if used sparingly.
- Dry Thoroughly: Immediately after washing, dry the skillet completely. You can place it on a stovetop over medium-low heat for a few minutes until all moisture evaporates.
- Re-oil: Once dry, apply another very thin layer of your chosen seasoning oil to the entire surface. Wipe off any excess, just like in the initial seasoning process. This protective layer ensures the skillet is ready for its next use and continues to build the seasoning.

Common Seasoning Mistakes to Avoid
- Too Much Oil: The most common mistake. Excess oil leads to a sticky, gummy, or patchy surface. Always wipe it down until it looks almost dry.
- Not Enough Heat: The oil needs to reach its smoke point to polymerize effectively.
- Not Drying Properly: Any moisture left on the skillet will lead to rust, which means stripping and re-seasoning.
- Using Harsh Abrasives or Soaps on New Seasoning: Be gentle with a newly seasoned skillet until a robust layer has formed.
Cooking Tips to Enhance Your Seasoning
Regular cooking, especially with fats, is the best way to further develop your skillet’s seasoning. Frying bacon, searing steaks, or shallow-frying vegetables will all contribute to a beautiful, slick surface. Initially, avoid cooking highly acidic foods like tomatoes or wine sauces, as these can strip away fresh seasoning. As the seasoning builds, your skillet will become more resilient.
The Legacy of a Well-Seasoned Skillet
Properly seasoning and maintaining your cast iron skillet is a labor of love that pays dividends with every delicious meal. It’s an investment in a durable, reliable piece of cookware that only gets better with age and use. By following these tips, you’re not just seasoning a pan; you’re preserving a tradition, creating an heirloom, and ensuring that your cast iron skillet will continue to tell its culinary story for generations to come.


