


Tips for safe, efficient backyard canning of excess produce?

When your garden yields more than you can eat fresh, backyard canning is a rewarding way to preserve the harvest, extend the shelf life of your produce, and stock your pantry with homemade goodness. It’s a cherished country living skill that, when done correctly, ensures food safety and maximizes efficiency. Let’s delve into the best practices for turning your surplus into delicious, shelf-stable provisions.
Embracing the Harvest: Why Backyard Canning?
Backyard canning is more than just a method of food preservation; it’s a sustainable practice that reduces food waste, saves money, and allows you to enjoy the fresh flavors of your garden year-round. From juicy tomatoes to crisp pickles, the satisfaction of opening a jar of your own preserved food is unparalleled. However, safety is paramount, and understanding the science behind canning is crucial for preventing spoilage and foodborne illnesses.

Safety First: Essential Equipment and Practices
Before you even begin, ensuring you have the right equipment and a clean workspace is non-negotiable. You’ll need high-quality canning jars, new lids (bands can be reused), a jar lifter, a canning funnel, a bubble remover, and the appropriate canner. Sterilize your jars and ensure all equipment is meticulously clean. Always follow tested recipes from reliable sources like the USDA Complete Guide to Home Canning, as improvising can be dangerous.
Key Equipment Checklist:
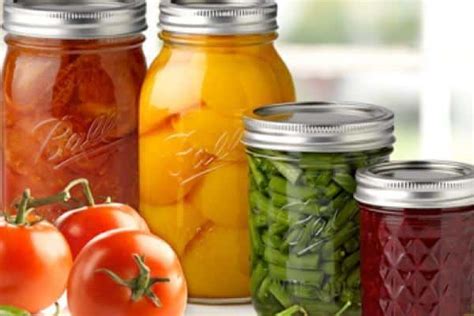
- Canning Jars (Mason jars) with two-piece lids (new flat lids, reusable bands)
- Jar lifter, canning funnel, headspace tool, bubble remover
- Canner (water bath or pressure, depending on food type)
- Large stockpot (for sterilizing jars if not processed in canner)
- Timer and kitchen towels
Choosing Your Canning Method Wisely
The type of food you’re preserving dictates the canning method you must use. There are two primary methods:
- Water Bath Canning: Suitable for high-acid foods like fruits, jams, jellies, pickles, and tomatoes (with added acid). This method involves submerging filled jars in boiling water for a specified time.
- Pressure Canning: Essential for low-acid foods such as vegetables, meats, poultry, and combination recipes. A pressure canner heats food to a much higher temperature than boiling water, effectively destroying harmful bacteria like Clostridium botulinum spores.
Never attempt to water bath can low-acid foods. The risk of botulism is too high. Invest in a reliable pressure canner if you plan to preserve vegetables or meats.
Produce Preparation: Quality In, Quality Out
The quality of your canned goods starts with the produce itself. Use fresh, blemish-free produce harvested at its peak. Wash everything thoroughly to remove dirt and debris. For some items, peeling, coring, or chopping is necessary. Follow your recipe precisely regarding preparation steps, as these can affect acidity, density, and ultimately, food safety and texture.
The Canning Process: Steps to Efficiency
Once your produce is prepared, follow these general steps, always adhering to your specific recipe’s instructions:
- Pack Jars: Fill jars with your prepared food, leaving the recommended headspace (usually 1/4 to 1 inch, depending on the food type).
- Add Liquid: If required, add hot brine, syrup, or water to cover the food.
- Remove Air Bubbles: Use a bubble remover tool to release trapped air, then adjust headspace if necessary.
- Wipe Rims: Clean jar rims thoroughly with a damp cloth to ensure a proper seal.
- Apply Lids and Bands: Center new flat lids on the jars and apply bands finger-tight.
- Process: Place jars in the appropriate canner (water bath or pressure) and process for the time specified in your recipe, adjusting for altitude.
- Cool: Once processing is complete, remove jars from the canner and place them on a towel on the counter to cool undisturbed for 12-24 hours.

Post-Canning Care and Storage
After cooling, check for proper seals. Lids should be concave and not flex when pressed. If a jar hasn’t sealed, refrigerate and consume its contents within a few days or reprocess it immediately with a new lid (within 24 hours). Remove bands, label jars with contents and date, and store them in a cool, dark, dry place. Properly canned goods can last for a year or more, but for best quality, aim to consume them within that timeframe.
Backyard canning is a fulfilling endeavor that connects you more deeply with your food and the rhythm of the seasons. By prioritizing safety, choosing the correct methods, and following tested recipes, you can confidently preserve your excess produce, ensuring a pantry full of delicious, wholesome food for your family to enjoy.

