What are simple real food recipes for preserving autumn garden bounty without fancy equipment?

Embracing the Autumn Harvest: Simple Preservation for Every Home
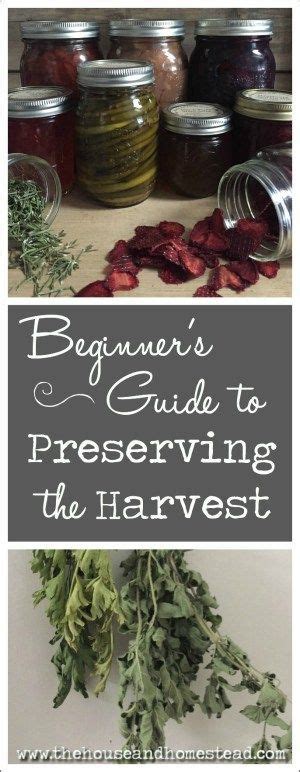
As the vibrant colors of autumn sweep across the landscape, home gardens often yield a final, abundant burst of produce. From crisp apples and hearty squash to a lingering supply of beans, tomatoes, and herbs, the autumn bounty can feel overwhelming. The good news is that you don’t need a high-tech kitchen or specialized gadgets to preserve these treasures. With a few basic tools and time-honored techniques, you can enjoy your garden’s goodness long after the last frost.
This article explores simple, real food recipes and methods for preserving your autumn harvest, focusing on techniques accessible to everyone. We’ll ditch the fancy equipment and embrace the joy of hands-on preservation.
Freezing: The Easiest Way to Lock in Freshness
Freezing is arguably the simplest and most effective method for preserving a wide variety of fruits and vegetables, often requiring little more than freezer bags and a pot of boiling water. Most vegetables benefit from blanching – a quick dip in boiling water followed by an ice bath – to stop enzyme action and preserve color, texture, and nutrients.
Simple Steps for Freezing Vegetables:
- Wash and chop vegetables (e.g., green beans, broccoli, corn kernels, peas).
- Blanch in boiling water for 1-3 minutes (timing varies by vegetable).
- Immediately transfer to an ice bath to cool rapidly.
- Drain thoroughly and pat dry.
- Spread in a single layer on a baking sheet to flash freeze for an hour or two (prevents clumping).
- Transfer to freezer-safe bags, remove as much air as possible, label, and store.
Freezing Fruits:
Many fruits, especially berries, can be frozen without blanching. Simply wash, dry thoroughly, and spread on a baking sheet to flash freeze before transferring to bags. Sliced apples or peaches can be tossed with a little lemon juice to prevent browning before freezing.

Drying and Dehydrating: Ancient Methods for Modern Pantries
Drying is a fantastic way to concentrate flavors and preserve foods for extended periods, especially herbs and fruit. While dedicated dehydrators exist, you can easily achieve great results using your oven or even just air.
Air Drying Herbs:
Tie small bundles of herbs (like oregano, thyme, rosemary, mint) together and hang them upside down in a warm, dry, well-ventilated area away from direct sunlight. They’re ready when they crumble easily, typically within 1-3 weeks. Store dried herbs in airtight containers.
Oven Drying Fruit Slices:
Thinly slice fruits like apples, pears, or even bananas. Arrange them in a single layer on parchment-lined baking sheets. Bake at the lowest oven temperature (usually 150-200°F or 65-93°C) for several hours, flipping occasionally, until they are leathery and pliable. Keep the oven door slightly ajar to allow moisture to escape. Store in airtight containers.

Fermentation Fun: Tangy and Probiotic-Rich Preserves
Fermentation transforms vegetables into probiotic-rich, tangy delights that last for weeks or even months in the refrigerator. All you need are vegetables, salt, water, and a clean jar!
Basic Sauerkraut:
- Finely shred one medium head of cabbage.
- Place in a large bowl and sprinkle with 1-2 tablespoons of non-iodized salt.
- Massage the cabbage vigorously for 5-10 minutes until it releases a good amount of liquid.
- Pack the cabbage tightly into a clean quart-sized mason jar, ensuring the liquid covers the cabbage completely.
- Place a smaller jar or a clean rock on top to keep the cabbage submerged.
- Cover the jar loosely with a lid or cloth.
- Let ferment at room temperature (65-75°F / 18-24°C) for 1-3 weeks, tasting periodically until desired sourness is reached.
- Once fermented, seal and store in the refrigerator.
Quick Refrigerator Pickles:
While not true fermentation, quick pickles use vinegar to preserve and are incredibly easy. Slice cucumbers, carrots, or green beans. Pack into jars. Heat a brine of equal parts vinegar (white or apple cider), water, 1 tablespoon salt, and 1 teaspoon sugar (optional) per cup of liquid. Add spices like dill, garlic, mustard seeds. Pour hot brine over vegetables, seal, let cool, and refrigerate. They’re ready in 24 hours and last for several weeks.

Simple Water Bath Canning: Jams, Jellies, and Tomato Sauces
Water bath canning is suitable for high-acid foods like fruits, jams, jellies, and most tomato products (often with added acid like lemon juice or vinegar). It requires basic canning jars, lids, rings, and a large stockpot with a rack (or a towel on the bottom) to keep jars off the pot. No pressure canner needed!
Homemade Apple Sauce or Fruit Jam:
- Peel, core, and chop apples. Cook with a small amount of water until soft. Mash or blend to desired consistency. Add sugar to taste (optional).
- For jam, combine chopped fruit (berries, peaches, plums) with sugar (often a 1:1 ratio, but can be less) and cook, stirring frequently, until thickened and it passes the cold plate test (a dollop wrinkles when pushed).
- Ladle hot sauce/jam into hot, sterilized canning jars, leaving 1/2 inch headspace.
- Wipe rims, apply lids and rings (finger-tight).
- Process in a boiling water bath for the recommended time (e.g., 10-15 minutes for jams, varying for sauce based on jar size and altitude).
- Carefully remove jars and let cool undisturbed for 12-24 hours. Check for seals.
Beyond the Jar: Root Cellaring and Infusions
Cool Storage for Root Vegetables and Squash:
Many root vegetables (carrots, potatoes, beets), onions, garlic, and winter squash can be stored for months in a cool, dark, and moderately humid environment. A cool basement, garage, or even a protected closet can serve as a makeshift root cellar. Ensure good air circulation and check periodically for any spoilage.
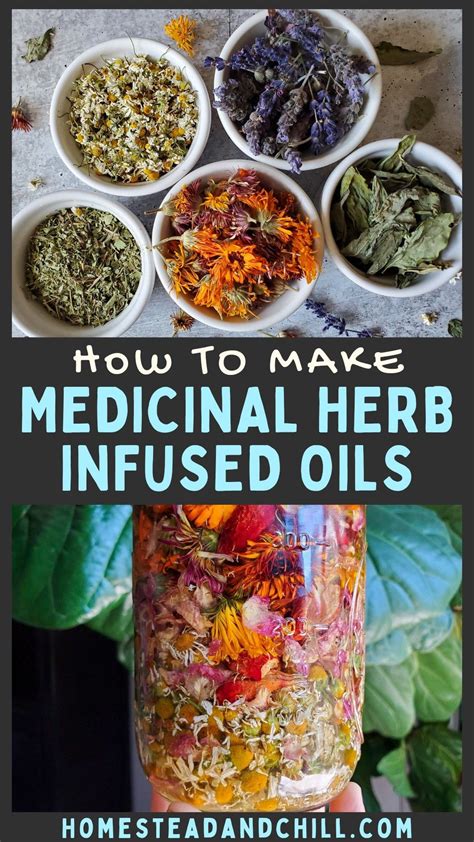
Herb and Garlic Infused Oils/Vinegars:
Infuse olive oil or apple cider vinegar with your garden herbs (rosemary, thyme, oregano) or garlic. Simply place clean, dry herbs/garlic in a clean bottle and fill with oil or vinegar. Let sit in a cool, dark place for 1-2 weeks, then strain out solids. These make wonderful additions to dressings, marinades, or cooking. *Note: For infused oils, it’s crucial to use fresh, thoroughly dried herbs to prevent botulism. For safety, homemade infused oils are best stored in the refrigerator and used within a few weeks.*
Tips for Preserving Success:
- Cleanliness is Key: Always work with clean hands, tools, and jars.
- Use Fresh Produce: The quality of your preserved food starts with fresh, ripe, undamaged ingredients.
- Label Everything: Include the contents and date of preservation.
- Store Properly: Keep preserved foods in a cool, dark place (except for refrigerated pickles/oils).
- Safety First: Always follow recommended safety guidelines for each preservation method.
Enjoying Your Hard Work All Year Round
Preserving your autumn garden bounty doesn’t have to be a daunting task reserved for master canners. By embracing these simple, real food recipes and methods, you can transform your harvest into a pantry full of delicious, healthy food to enjoy throughout the colder months. Each jar, bag, or dried herb will be a flavorful reminder of your garden’s generosity and your own culinary efforts.