What are simple, safe home canning tips for excess garden produce?
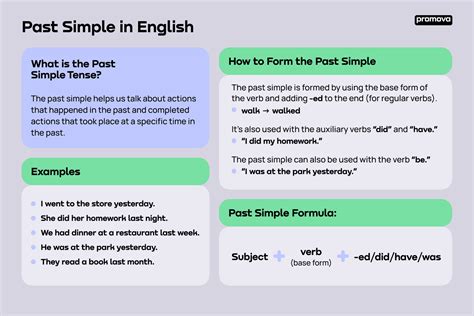
When your garden is overflowing with ripe tomatoes, crisp cucumbers, or bountiful beans, home canning offers a satisfying and economical way to preserve your harvest. Beyond the joy of self-sufficiency, having a pantry stocked with homemade goodness is incredibly rewarding. However, successful canning hinges on understanding and strictly following safety guidelines to prevent spoilage and foodborne illnesses. This guide will walk you through simple, safe tips to get started with home canning.
Why Preserve Your Harvest?
Preserving your garden’s bounty allows you to enjoy fresh flavors long after the growing season ends. It reduces food waste, saves money on groceries, and gives you complete control over the ingredients in your food, avoiding unwanted additives and preservatives. Home-canned goods also make thoughtful, personalized gifts, sharing a piece of your hard work and culinary skill with loved ones.
Safety First: Preventing Foodborne Illness
The most critical aspect of home canning is safety. Improper canning can lead to botulism, a serious and potentially fatal foodborne illness. This is why following tested recipes and methods precisely is non-negotiable. Always use current guidelines from reputable sources like the National Center for Home Food Preservation (NCHFP) or university extension offices. Never improvise or reduce processing times, as these are scientifically determined to ensure safety.
Essential Canning Equipment
Before you begin, gather the necessary tools. While some items are universal, others depend on your chosen canning method. Here’s a basic list:
- Canning Jars: Glass jars specifically designed for canning (e.g., Mason jars) with two-piece lids (flat lid and screw band). Always inspect jars for chips or cracks.
- Jar Lifter: For safely moving hot jars in and out of the canner.
- Funnel: To neatly fill jars without spilling.
- Headspace Tool/Ruler: To measure the space between the food and the jar lid.
- Bubble Remover: A non-metallic utensil to remove air bubbles from packed jars.
- Large Pot for Sterilization/Heating: For warming jars and lids.
Depending on your chosen method, you’ll also need either a water bath canner or a pressure canner.

Understanding Canning Methods
There are two primary methods for home canning, each suited for different types of food based on their acidity:
1. Water Bath Canning (for High-Acid Foods)
This method is safe for high-acid foods (pH 4.6 or below), such as fruits, fruit juices, jams, jellies, pickles, and tomatoes (often with added acid like lemon juice or citric acid). In a water bath canner, jars are submerged in boiling water and processed for a specific time. The high acidity, combined with the heat, destroys spoilage organisms and creates a vacuum seal.
2. Pressure Canning (for Low-Acid Foods)
Pressure canning is essential for low-acid foods (pH above 4.6), which include most vegetables, meats, poultry, seafood, and mixed recipes like soups. These foods require higher temperatures (achieved only through pressure) to destroy Clostridium botulinum spores, which can thrive in low-acid, oxygen-free environments. A special pressure canner is used to reach and maintain these necessary temperatures.

Key Tips for Successful and Safe Canning
- Use Tested Recipes: Always use recipes from reliable sources like the NCHFP, Ball Blue Book, or university extension services. Do not alter ingredients, processing times, or methods.
- Fresh, Quality Produce: Start with fresh, blemish-free produce. Wash thoroughly. Overripe or damaged produce can compromise safety and flavor.
- Cleanliness is Key: Ensure all equipment, jars, and your workspace are meticulously clean. Sterilize jars if the recipe calls for it (some modern pressure canning methods negate the need for pre-sterilization, but always check your recipe).
- Correct Headspace: Leave the exact amount of headspace specified in the recipe. Too little and food might bubble out; too much and the jar may not seal properly.
- Remove Air Bubbles: After filling jars, use a non-metallic utensil to remove trapped air bubbles before sealing.
- Wipe Jar Rims: Before placing lids, wipe jar rims clean with a damp cloth to ensure a good seal.
- Proper Lid Tightness: Apply screw bands fingertip-tight – tight enough to prevent leaking, but not so tight that air cannot escape during processing.
- Follow Processing Times: Never shorten processing times, even if you are at a higher altitude (adjustments are needed for altitude).
- Check Seals: After cooling for 12-24 hours, check jar seals. Lids should be concave (curved inward) and not flex when pressed. If a jar doesn’t seal, refrigerate and consume within a few days, or reprocess within 24 hours using a new lid.
- Store Properly: Store sealed jars in a cool, dark, dry place. Remove screw bands for long-term storage, as they can rust or create a false seal.
Conclusion
Home canning can be a deeply rewarding endeavor, allowing you to enjoy the fruits (and vegetables!) of your labor year-round. By understanding the basics, investing in the right equipment, and, most importantly, adhering strictly to tested safety guidelines, you can confidently preserve your excess garden produce. Happy canning!