


What are the safest methods for canning high-acid garden tomatoes at home?
Embracing the Bounty: Safe Home Canning for Garden Tomatoes
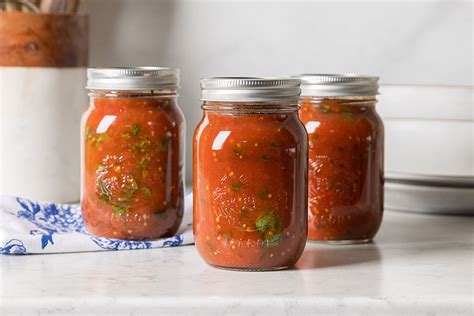
There’s immense satisfaction in harvesting ripe, juicy tomatoes from your garden. Turning that fresh produce into pantry staples for the colder months is a rewarding endeavor, but it requires strict adherence to food safety principles. For high-acid foods like most tomatoes, water bath canning is the go-to method, ensuring both deliciousness and safety against spoilage and harmful bacteria.

Understanding Tomato Acidity and Its Role in Canning Safety
Tomatoes are generally considered high-acid foods, making them suitable for water bath canning. The high acidity (pH 4.6 or below) naturally inhibits the growth of Clostridium botulinum, the bacteria responsible for botulism, a rare but serious foodborne illness. However, some newer tomato varieties, overripe tomatoes, or those grown in certain conditions can have slightly lower acidity, nudging them closer to the danger zone.
To ensure safety, especially with an unknown pH or for added peace of mind, it’s a best practice to acidify tomatoes before canning. This can be done by adding:
- 1 tablespoon of bottled lemon juice per pint jar, or 2 tablespoons per quart jar.
- 1/2 teaspoon of citric acid per pint jar, or 1 teaspoon per quart jar.
Do not use fresh lemon juice, as its acidity can vary. Bottled lemon juice or citric acid provides a consistent, reliable level of acidity.
Essential Equipment for a Safe Canning Process
Having the right tools is crucial for successful and safe home canning. Before you begin, gather these items:
- Water Bath Canner: A large pot with a lid and a rack to keep jars off the bottom, allowing water to circulate.
- Canning Jars: Mason-type jars (pint or quart) specifically designed for canning. Ensure they are free from nicks, cracks, or chips.
- New Lids and Bands: Use new canning lids for each batch, as the sealing compound can only be reliably used once. Bands can be reused if they are rust-free and not bent.
- Jar Lifter: For safely placing and removing hot jars from the canner.
- Canning Funnel: Helps prevent spills and keeps jar rims clean.
- Headspace Tool/Ruler: To measure the correct amount of space between the food and the jar lid.
- Ladle: For filling jars.
- Bubble Remover: A non-metallic utensil to remove air bubbles from filled jars.

The Water Bath Canning Method: Step-by-Step Safety
Once your equipment is ready and your tomatoes are selected (firm, ripe, and free from blemishes), follow these steps:
1. Prepare Your Tomatoes
- Wash tomatoes thoroughly under cold running water.
- You can can tomatoes whole, halved, or crushed. For whole or halved, it’s often recommended to peel them. To peel, blanch tomatoes in boiling water for 30-60 seconds, then immediately immerse in ice water. The skins should slip off easily. Remove cores.
2. Prepare Jars and Lids
- Wash jars in hot soapy water and rinse thoroughly. They must be hot when filled with hot food to prevent thermal shock. Sterilization is generally not required if processing time is 10 minutes or more, but ensuring they are clean and hot is critical.
- Place new lids in a small saucepan of simmering (not boiling) water to soften the sealing compound. Keep bands handy.
3. Fill Jars Safely
- Using a canning funnel, carefully fill hot jars with your prepared tomatoes. Pack them firmly, leaving appropriate headspace (usually 1/2 inch for tomatoes). For whole or halved tomatoes, you can add hot water, tomato juice, or pack raw and add hot water.
- Add the required amount of bottled lemon juice or citric acid to each jar.
- Slide a non-metallic bubble remover tool along the inside of the jar to release trapped air bubbles. Recheck headspace and add more liquid if necessary.
- Wipe jar rims clean with a damp cloth. Any food residue can prevent a proper seal.
- Center a warm lid on each jar, then screw on the band fingertip-tight (just until resistance is met, do not overtighten).
4. Process in the Water Bath Canner
- Place filled jars onto the rack in the water bath canner.
- Add hot water to the canner until jars are covered by at least 1-2 inches of water.
- Cover the canner with its lid and bring the water to a rolling boil.
- Once boiling vigorously, begin timing the processing. Processing times vary by tomato style, jar size, and altitude. Always refer to current USDA guidelines or a reputable university extension canning guide for precise times. For most tomato products at sea level, pint jars are processed for 35-40 minutes and quart jars for 40-45 minutes. Adjust for altitude if you live above 1,000 feet.

5. Cooling and Storing
- Once processing is complete, turn off the heat and carefully remove the canner lid. Let jars sit in the hot water for 5 minutes before carefully lifting them out with a jar lifter.
- Place hot jars upright on a towel-lined surface, ensuring they are not touching each other or a cold surface (to prevent breakage).
- Allow jars to cool undisturbed for 12-24 hours. You’ll hear the satisfying “ping” as lids seal.
- After cooling, check seals. Lids should be concave and not flex when pressed. Remove bands, wipe jars clean, label with contents and date, and store in a cool, dark, dry place. Any unsealed jars should be refrigerated and consumed within a week.

Adherence to Guidelines: Your Safest Bet
The single most important rule in home canning is to always follow tested and approved recipes and guidelines. Resources like the National Center for Home Food Preservation (NCHFP) and your local university extension offices provide research-based, up-to-date recommendations. Avoid untested recipes from blogs or old family cookbooks that may not meet current safety standards.
By diligently following these safe methods, you can confidently enjoy the taste of your garden’s bounty all year long, knowing each jar is a testament to careful preservation and deliciousness.


