What are your best tips for packing real food & homemade snacks for road trips?

Embarking on a road trip offers unparalleled freedom and adventure, but it often comes with the challenge of finding healthy, affordable meals on the go. While fast food might seem convenient, packing your own real food and homemade snacks can significantly enhance your journey, keeping you energized, nourished, and saving you money. Here’s how to master the art of road trip provisions.
The Benefits of Packing Your Own Grub
Opting for homemade provisions over convenience store fare or drive-thrus isn’t just about saving money, though that’s a significant perk. It’s about controlling ingredients, avoiding unhealthy additives, catering to dietary needs, and enjoying tastier, more satisfying meals. You’ll feel better, have more sustained energy, and avoid the dreaded post-fast-food slump, making your driving experience more pleasant and safer.
Pre-Trip Planning: Your Culinary Road Map
Successful road trip eating starts long before you hit the highway. A little planning goes a long way:
1. Assess Your Trip Duration & Vehicle Capabilities
- Route & Stops: Plan where you’ll be able to rest, eat, and potentially restock or dispose of trash.
- Cooler Space: How much room do you have for coolers? Do you have access to a 12V cooler or just ice packs?
- Cooking Access: Will you have access to a microwave or stove at any overnight stops?
2. Create a Menu & Shopping List
Think about meals and snacks for each day. Focus on foods that are:
- Non-Perishable or Low-Perishable: Especially for items not going in the cooler.
- Easy to Eat: Finger foods are king. Avoid anything too messy or requiring utensils if possible.
- Nutrient-Dense: Keep energy levels steady with proteins, healthy fats, and complex carbohydrates.

Smart Food Choices: What to Pack
Variety is key to preventing palate fatigue. Here are some top contenders:
Hearty Meals & Sandwiches
- Wraps & Sandwiches: Use hearty bread, tortillas, or pita pockets. Fill with lean protein (turkey, ham, hard-boiled eggs), cheese, and sturdy veggies like spinach or roasted peppers. Pack dressing separately.
- Pasta Salads/Grain Bowls: Make a quinoa or pasta salad with veggies, chickpeas, or grilled chicken. Dress lightly or bring extra dressing.
- Overnight Oats/Yogurt Parfaits: Great for breakfast, pack in jars with granola and berries. Keep cold!
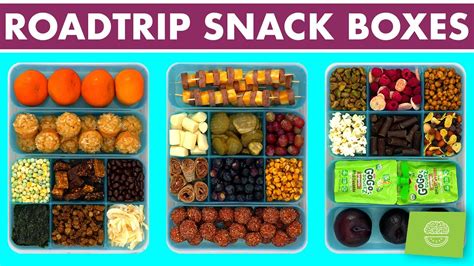
Power-Packed Snacks
- Fresh Fruit: Apples, oranges, grapes, bananas (eat quickly), berries (in a sturdy container).
- Vegetables: Carrot sticks, cucumber slices, bell pepper strips, cherry tomatoes with hummus cups.
- Nuts & Seeds: Almonds, walnuts, cashews, pumpkin seeds. A great source of healthy fats and protein.
- Homemade Energy Balls/Granola Bars: Customize with oats, nut butter, dried fruit, and seeds.
- Hard-Boiled Eggs: Excellent protein source, peel before you go for easy eating.
- Cheese Sticks/Cubes: Easy to grab and satisfying.
- Dried Fruit: Raisins, apricots, mango slices – an easy natural sugar boost.
- Pretzels/Whole-Grain Crackers: Good for crunch and dipping.
Hydration Station
Don’t forget drinks! Reusable water bottles are a must. Consider insulated bottles to keep water cold. Small cartons of juice or plant-based milk can also be good options. Avoid sugary sodas that lead to energy crashes.

Packing Like a Pro: Tips for Organization & Food Safety
How you pack is almost as important as what you pack. Proper packing ensures food stays fresh, accessible, and safe.
1. The Cooler Command Center
- Pre-Chill: Chill your cooler and all items before packing.
- Ice vs. Ice Packs: Use a combination. Ice packs are less messy. For ice, use block ice which melts slower, or freeze water bottles to serve double duty.
- Layering: Heavier, less frequently accessed items on the bottom (drinks, main meal components). Snacks and frequently accessed items on top.
- Separate Containers: Use small, leak-proof containers for dressings, dips, and smaller portions.
2. Smart Storage Solutions
- Airtight Containers: Essential for preventing leaks and keeping food fresh. Glass containers are great but can be heavy; sturdy plastic is a good alternative.
- Snack Bags: Reusable silicone bags or small reusable containers are perfect for individual portions of nuts, fruit, or veggies.
- Designated Snack Bag: Keep a small, easily accessible bag with dry snacks (nuts, crackers, fruit) in the passenger area, separate from the main cooler.
3. Food Safety First
Perishable foods shouldn’t be left at unsafe temperatures for more than two hours (or one hour if it’s over 90°F/32°C). Replenish ice as needed, and consider carrying a small thermometer to monitor cooler temperature.

On the Road: Making it Work
Once you’re driving, accessibility is key. Keep napkins, wet wipes, and a trash bag easily reachable. Rotate snacks to keep things interesting. Don’t forget cutlery if needed, and a small cutting board and knife can be handy for fresh prep at rest stops.
With a bit of foresight and smart packing, your road trip meals can be just as exciting and fulfilling as your destination. Enjoy the journey, one delicious, homemade bite at a time!