


What’s the simplest DIY plan for a sturdy raised garden bed?

Why Choose a Simple, Sturdy Raised Bed?
Raised garden beds have revolutionized home gardening for many, offering a multitude of benefits from improved drainage and fewer weeds to easier access and extended growing seasons. The beauty of a well-designed raised bed lies in its ability to transform even the most challenging soil into a fertile haven for your plants. While many complex designs exist, our focus today is on constructing a raised garden bed that is both incredibly simple to build and remarkably sturdy, ensuring it stands the test of time and weather.
This plan is tailored for beginners, requiring minimal tools and woodworking experience, yet resulting in a robust structure capable of supporting healthy plant growth for years. Let’s dive into creating a practical and beautiful addition to your backyard!

Essential Materials and Tools for Your Project
Before you begin, gathering all your materials and tools will streamline the construction process. We’ll aim for readily available items to keep this plan truly simple and budget-friendly.
Materials:
- Lumber: For a standard 4×8 foot bed, you’ll need four 8-foot long boards and four 4-foot long boards. Common choices include 2×6, 2×8, or 2×10 cedar, redwood, or untreated pine (if you’re okay with shorter lifespan or plan to line it). If using pressure-treated lumber, ensure it’s rated for ground contact and safe for edibles (e.g., ACQ or CA-treated).
- Exterior Screws: 2.5-inch or 3-inch exterior-grade screws (e.g., deck screws) are essential for durability.
- Internal Corner Braces (Optional but Recommended): Four 2×2 or 4×4 posts, cut to the height of your raised bed, for added stability at each corner.
- Weed Barrier Fabric (Optional): To prevent weeds from growing up into your bed.
Tools:
- Measuring tape and pencil
- Miter saw or circular saw (for cutting lumber)
- Electric drill/driver with appropriate drill bits (for pilot holes and driving screws)
- Level
- Spade or shovel (for site preparation)
- Safety glasses and gloves
Step-by-Step Construction Guide
1. Plan Your Dimensions and Location
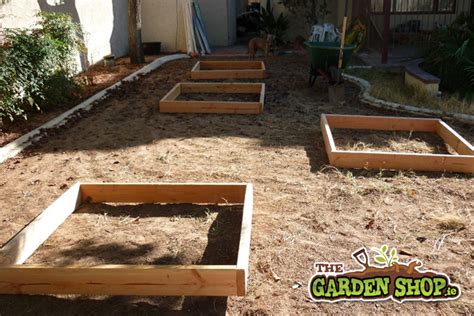
A 4×8 foot bed is popular because it allows easy reach to the center from either long side. Consider the amount of sunlight your chosen location receives throughout the day (most vegetables need 6+ hours) and ensure the ground is relatively level. Mark out the area with stakes or spray paint to visualize your bed.
2. Cut Your Lumber
Using your saw, carefully cut your lumber to the desired lengths. For a single-layer 4×8 bed, you’ll have two 8-foot boards and two 4-foot boards. If you’re building a taller bed with multiple layers (e.g., using two 2×8 boards per side for a 16-inch height), you’ll double these quantities.

3. Assemble the First Layer Frame
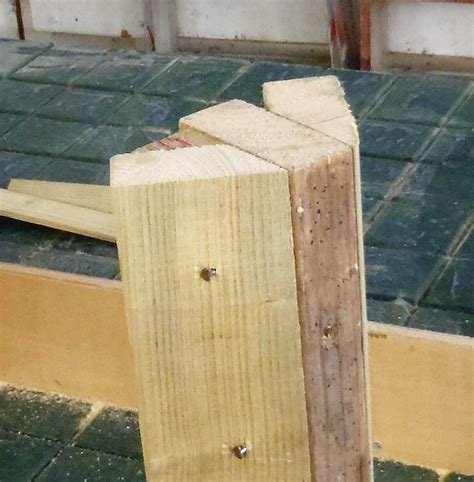
Lay out your cut boards to form a rectangle. The simplest joint is a butt joint where the end of one board meets the face of another. At each corner, drill two pilot holes through the face board into the end of the perpendicular board. This prevents the wood from splitting. Drive your exterior screws through the pilot holes to securely join the boards.
4. Add Internal Corner Braces (For Enhanced Sturdiness)
For a truly sturdy bed, cut four pieces of 2×2 or 4×4 lumber to the exact height of your assembled frame. Place one brace inside each corner of the assembled frame, flush with the top edge. Screw through the frame boards into these internal posts using 2-3 screws per side, per post. These braces will significantly strengthen your bed and prevent bowing.
5. Stack Additional Layers (For Taller Beds)
If you’re building a taller bed (e.g., 12-16 inches high), repeat steps 3 and 4 for subsequent layers. Place the second layer directly on top of the first. For added strength, stagger the corner joints if possible (e.g., place a long side board from the top layer over a short side board from the bottom layer). Screw the top layer into the layer below it, and also into the internal corner posts.
6. Prepare the Site and Place Your Bed
With your bed frame assembled, prepare its final resting spot. Clear any debris, level the ground as much as possible, and remove any existing weeds. If desired, lay down a layer of weed barrier fabric to prevent future weeds from invading your garden bed. Carefully place your assembled raised bed frame onto the prepared site, ensuring it is level using your spirit level.
7. Fill Your Raised Bed
Now comes the exciting part – filling your raised bed! For optimal plant health, use a high-quality raised bed mix or create your own “lasagna” style bed with layers of organic matter (cardboard, leaves, compost, soil). Avoid using heavy garden soil which can compact and impede drainage.

Tips for Longevity and Success
- Wood Choice: Cedar and redwood are naturally rot-resistant and beautiful, but more expensive. Non-toxic treated lumber is a good balance of cost and durability.
- Drainage: Ensure your bed has adequate drainage. If placed on concrete or pavers, drill drainage holes in the bottom if applicable (though most raised beds sit directly on the ground).
- Watering: Raised beds tend to dry out faster than in-ground gardens, so monitor soil moisture closely.
- Maintenance: Periodically check screws and joints for looseness and tighten as needed.
Conclusion
Building a sturdy and functional raised garden bed doesn’t have to be a complicated endeavor. By following this simple plan, even a novice DIYer can construct a beautiful and durable structure that will provide years of gardening pleasure. Gather your materials, dedicate a weekend, and get ready to enjoy the bountiful harvests from your very own handmade raised bed!


